*IF* the part number is on the white plastic "chassis" of the tach, then there are at least two different part numbers:
1.) Face says 1/min x 1000 -- p/n 88471140 (also VDO embossed below number). At the very top of the face, in very small lettering, it says 0003.
2.) Face says X1000 -- p/n 88471060 (also VDO...). At the very top, it says 0002.
Of course, these numbers have eight digits, which means they may be VDO numbers, not Saab. Or, that the last zero is truncated?? Dunno -- prolly need someone with microfiche, as the parts pre-date anything on the web or EPC.
'73 Notchback Road Racer
Re: '73 Notchback Road Racer
DrewP wrote:In the U.S. the 8,000 tachs only came on the very early 900's, 1979-1982 I believe, for 1983 they had the 7,000 rpm dial.
Yep, that sounds about right, and only on turbos and ems's, the base models had a giant clock :)
Also, somehow I missed the paint updates while I was on vacation - looking awesome Drew!!!!
-
DrewP

- Posts: 2084
- Joined: Wed Dec 26, 2007 8:27 pm
- Nickname: TANK
- Number of Saabs currently owned: 1
- Location: Monrovia, CA
Re: '73 Notchback Road Racer
Luke wrote:Also, somehow I missed the paint updates while I was on vacation - looking awesome Drew!!!!
I have excellent inspiration!

"You can educate ignorance, but you can't fix stupid."

Re: '73 Notchback Road Racer
Hi guys
Thanks, I will go on the hunt for an early 900 EMS/TURBO tach then.
Must have 8K tach in my raceproject 99...
Thanks, I will go on the hunt for an early 900 EMS/TURBO tach then.
Must have 8K tach in my raceproject 99...
Best regards. Jakob Jensen - Denmark
Building a 99 hill climb/track racer
Building a 99 hill climb/track racer
-
DrewP
- Posts: 2084
- Joined: Wed Dec 26, 2007 8:27 pm
- Nickname: TANK
- Number of Saabs currently owned: 1
- Location: Monrovia, CA
Re: '73 Notchback Road Racer
Got lots done, haven't had time to write anything up.
This is some of the prep I did putting the engine all together and getting that ready to go:
I always pull the oil pump cover now and triple check everything. Tom did a good job getting everything prepped, I just get a little anal about starting up a fresh engine. Tom had the oil pump gears already partially packed with assembly lube to help prime the pump, and I finished that all up.
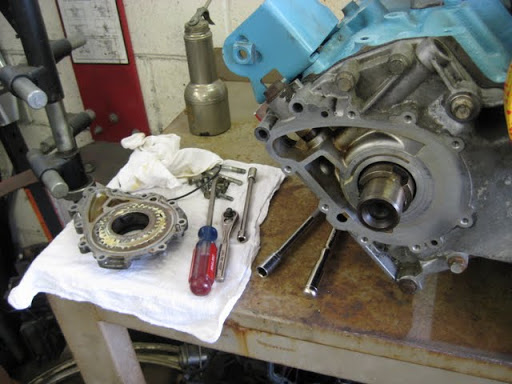
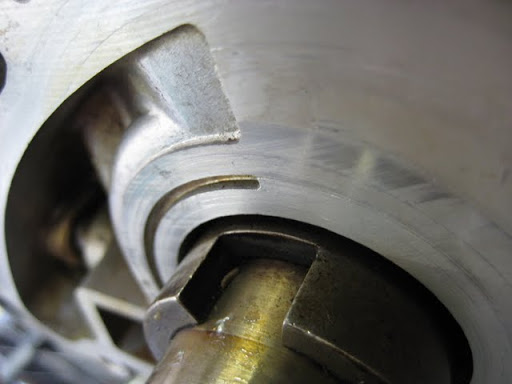
Bearing thrust surface for pump gears on timing cover looks good.
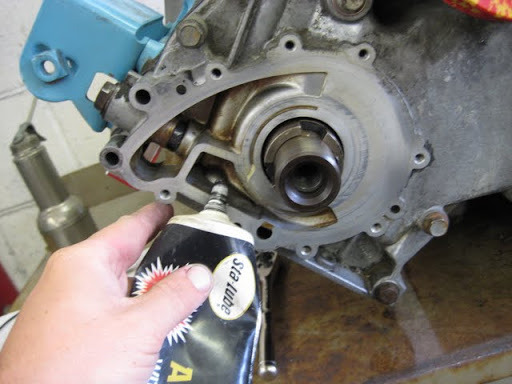
I also always remove the oil pressure regulating valve and clean / grease it up to make sure it doesn't get stuck, I'm glad I did:
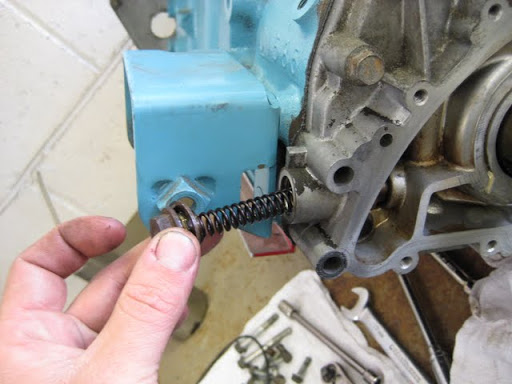
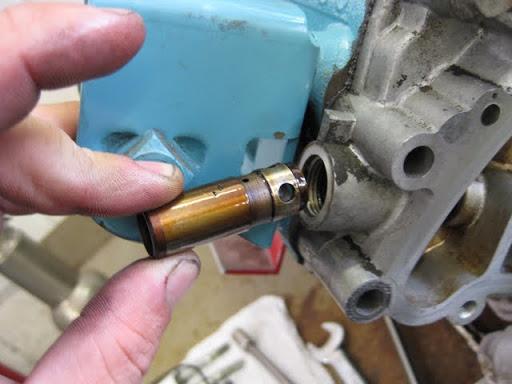
The bleed orifices in the piston had some little bits of gunk in them, may not have been cleaned on initial assembly, you don't want any of that causing the piston to seize and get stuck open, that'll give low oil pressure @ low RPM.
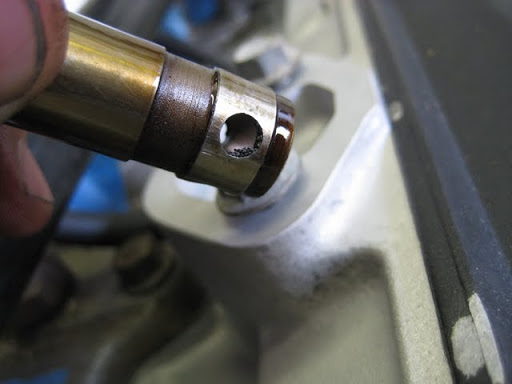
Little black moly assembly lube on piston after cleaning out bore and back in it goes.
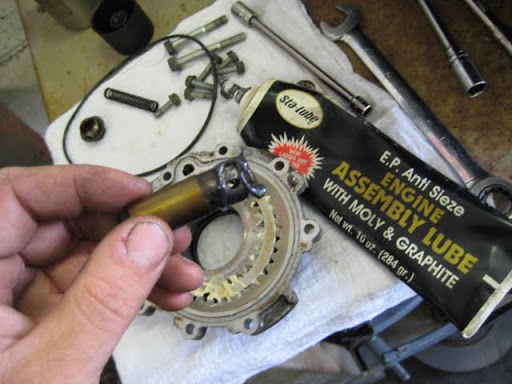
Then I pack the rest of the space in the pump gears w/ assembly lube...
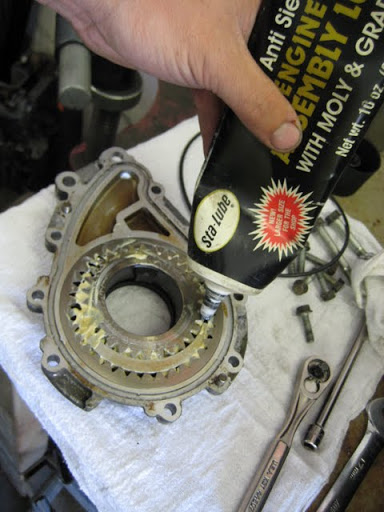
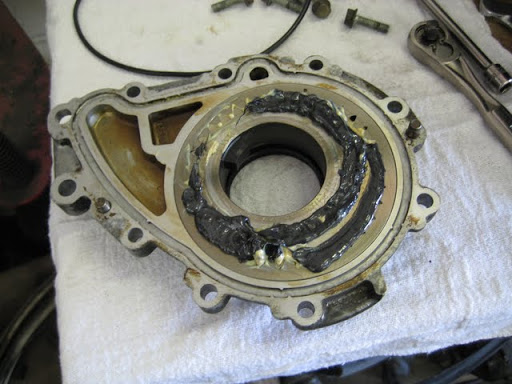
....And I fill the suction port in the timing cover part way with lube too so I'm sure I get good suction on cranking.
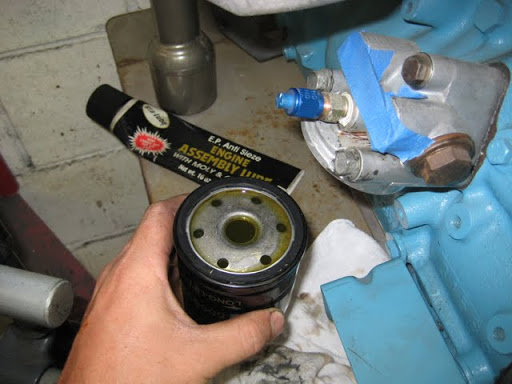
Then once the oil pump cover is back on, prime the pressure side through the filter housing with fresh engine oil....


Then fill and oil filter w/ fresh oil and install.
One interesting thing I found is that 2.1L crank pulleys that have the hall sensor on the pulley rather than in the distributor are significantly lighter than the early turbo pulley / harmonic balancers.
They have a pretty big relief cut into them to recess the trigger wheel into, so I used one of those pulleys on my N/A engine, along with an aluminum flywheel.


This is some of the prep I did putting the engine all together and getting that ready to go:
I always pull the oil pump cover now and triple check everything. Tom did a good job getting everything prepped, I just get a little anal about starting up a fresh engine. Tom had the oil pump gears already partially packed with assembly lube to help prime the pump, and I finished that all up.
Bearing thrust surface for pump gears on timing cover looks good.
I also always remove the oil pressure regulating valve and clean / grease it up to make sure it doesn't get stuck, I'm glad I did:
The bleed orifices in the piston had some little bits of gunk in them, may not have been cleaned on initial assembly, you don't want any of that causing the piston to seize and get stuck open, that'll give low oil pressure @ low RPM.
Little black moly assembly lube on piston after cleaning out bore and back in it goes.
Then I pack the rest of the space in the pump gears w/ assembly lube...
....And I fill the suction port in the timing cover part way with lube too so I'm sure I get good suction on cranking.
Then once the oil pump cover is back on, prime the pressure side through the filter housing with fresh engine oil....
Then fill and oil filter w/ fresh oil and install.
One interesting thing I found is that 2.1L crank pulleys that have the hall sensor on the pulley rather than in the distributor are significantly lighter than the early turbo pulley / harmonic balancers.
They have a pretty big relief cut into them to recess the trigger wheel into, so I used one of those pulleys on my N/A engine, along with an aluminum flywheel.
"You can educate ignorance, but you can't fix stupid."
-
DrewP
- Posts: 2084
- Joined: Wed Dec 26, 2007 8:27 pm
- Nickname: TANK
- Number of Saabs currently owned: 1
- Location: Monrovia, CA
Re: '73 Notchback Road Racer
I also picked this up used for a good price:

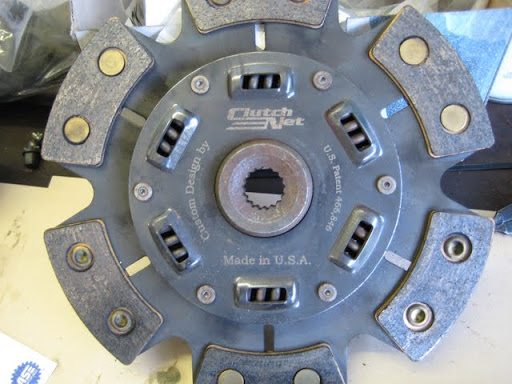
A nice used Fidanza aluminum flywheel already doweled for mid-generation 9000 pressure plate, and a ClutchNet 6-puck semi-metallic disc with something like 5k miles on it.
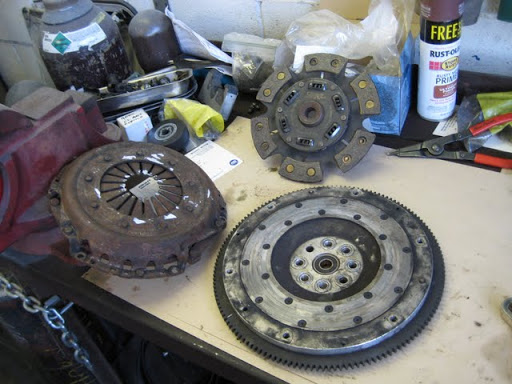
After a little cleanup. Not too much wear on the friction surface, and I will keep this flywheel in the N/A engine anyhow so it won't see tons of power.
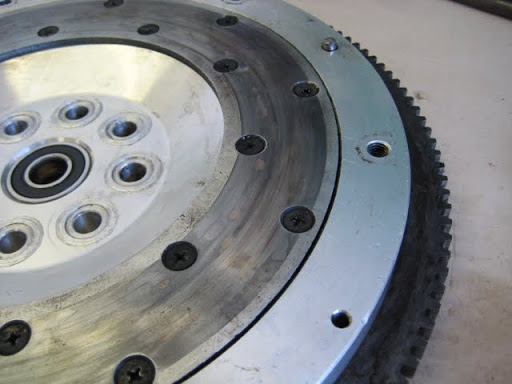
One thing I thought was interesting was that it looks to have been balanced by grinding off the tips of the mounting screws that hold the friction surface on (which have nice all-metal jet nuts on the back as well). On the steel flywheels there's usually drilled holes around the perimeter for balancing.
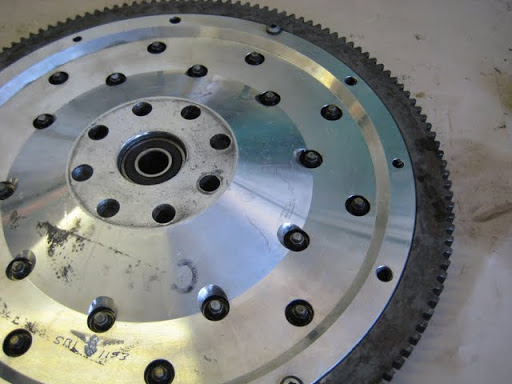
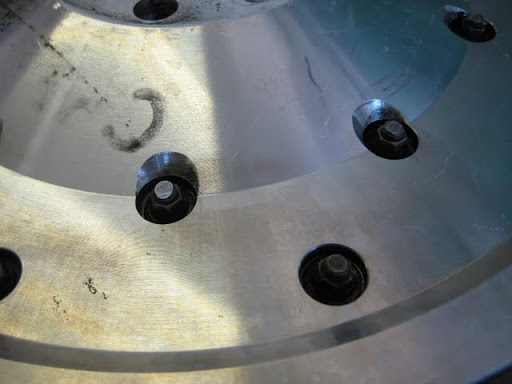
Looks pretty racy.

A nice used Fidanza aluminum flywheel already doweled for mid-generation 9000 pressure plate, and a ClutchNet 6-puck semi-metallic disc with something like 5k miles on it.
After a little cleanup. Not too much wear on the friction surface, and I will keep this flywheel in the N/A engine anyhow so it won't see tons of power.
One thing I thought was interesting was that it looks to have been balanced by grinding off the tips of the mounting screws that hold the friction surface on (which have nice all-metal jet nuts on the back as well). On the steel flywheels there's usually drilled holes around the perimeter for balancing.
Looks pretty racy.
"You can educate ignorance, but you can't fix stupid."
-
turbo stephan
- Posts: 144
- Joined: Fri May 20, 2011 8:11 pm
- Number of Saabs currently owned: 3
- Location: Beach City
Re: '73 Notchback Road Racer
Good progress Drew. I have a question about the oil pump though. Why did you not use one of the newer pump gear sets which have three of instead of one tappet? If you have three there is a much lower risk of loosing oil pump function due to a broken tappet.
Stephan
Stephan
-
DrewP
- Posts: 2084
- Joined: Wed Dec 26, 2007 8:27 pm
- Nickname: TANK
- Number of Saabs currently owned: 1
- Location: Monrovia, CA
Re: '73 Notchback Road Racer
I've never seen (or heard of a broken one), I didn't even know it got changed. Will keep an eye out from now on, but for the most part our stock of used engine hard parts are in pretty poor shape. This is the pump that came in this engine and the side thrust surfaces and tooth surfaces were all pretty much pristine so I was happy with it.
"You can educate ignorance, but you can't fix stupid."
Re: '73 Notchback Road Racer
They do break at high rpm, and even sometimes randomly in street cars. Although it's not real common, I've seen a few. The single cog types are actually more of a rarity these days, I think everything from 86 on had the 3 prong type.
-
DrewP
- Posts: 2084
- Joined: Wed Dec 26, 2007 8:27 pm
- Nickname: TANK
- Number of Saabs currently owned: 1
- Location: Monrovia, CA
Re: '73 Notchback Road Racer
Weird.
More shit that I have to hoard away.... awesome....
More shit that I have to hoard away.... awesome....
"You can educate ignorance, but you can't fix stupid."
-
squaab99t

- Posts: 1262
- Joined: Wed Mar 28, 2007 5:43 pm
- Number of Saabs currently owned: 4
- Location: Shoreline Wa
Re: '73 Notchback Road Racer
Thanks for the great tip on the oil pump and priming. Just about to start that end of the my engine rebuild.
You car is looking very good.
You car is looking very good.
-
DrewP
- Posts: 2084
- Joined: Wed Dec 26, 2007 8:27 pm
- Nickname: TANK
- Number of Saabs currently owned: 1
- Location: Monrovia, CA
Re: '73 Notchback Road Racer
On the suspension front.
I had 2 real issues with putting the later C900 rear axle into the early 99 body.
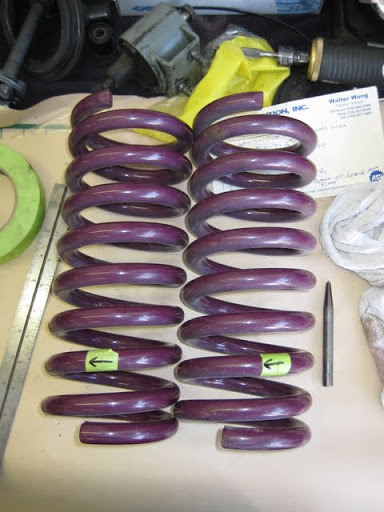
1) The upper perches for the rear springs (on the body) were the wrong size. The 99 springs are a smaller diameter winding than the 900 Intrax springs I wanted to use.
2) Panhard rod doesn't fit. The 99 bar is longer, and lines up with the body in a completely different place.
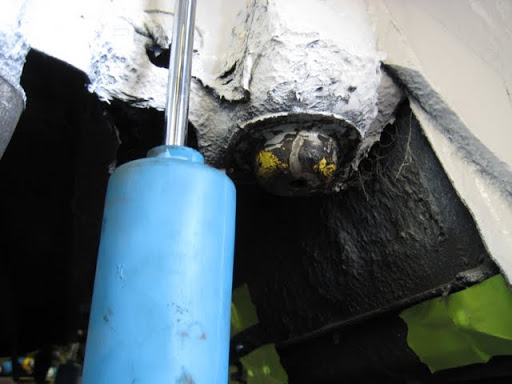
Perches on the body look like this. They are just glued on.
There's a little nub that centers the spring seat, looks like this.
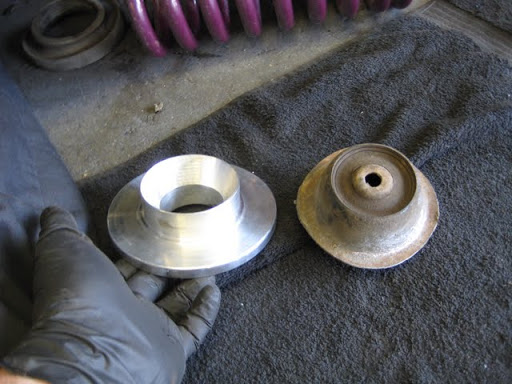
David made these for the car in the machine shop from some scrap 6061, they center on the body in the same way as the originals, but have the right seat diameter to accept the larger diameter C900 springs.
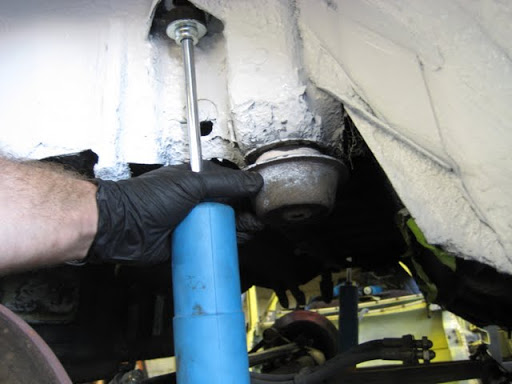
I bolted the leading and trailing links to the body, and jacked the axle up to where I wanted it to sit to take a measurement of the installed spring height I'd need.

I decided to start with taking 2 coils off each spring to see where that got me.
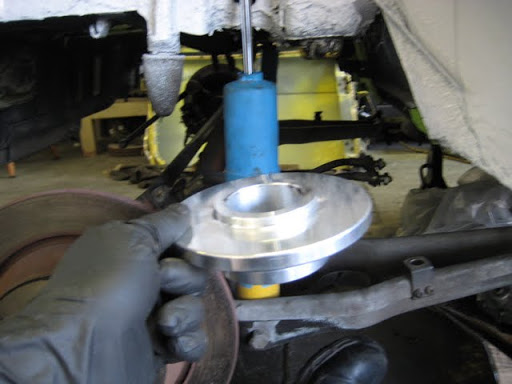
Installed.
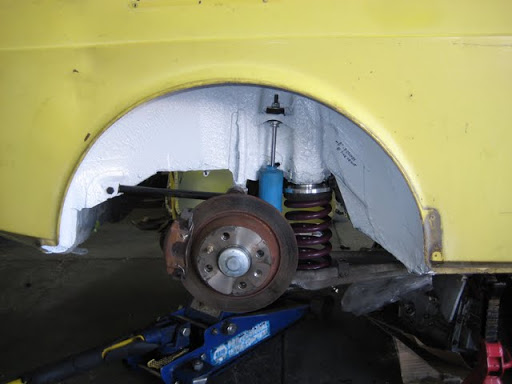
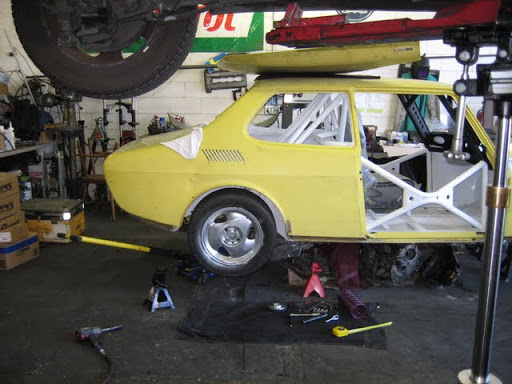
This is with jackstands under the axle so the weight of the car is on the springs, ride height looks just a touch higher than I want it, and only about 100 lbs is going back into the back of the car, so I think this worked out about perfectly.
I had 2 real issues with putting the later C900 rear axle into the early 99 body.
1) The upper perches for the rear springs (on the body) were the wrong size. The 99 springs are a smaller diameter winding than the 900 Intrax springs I wanted to use.
2) Panhard rod doesn't fit. The 99 bar is longer, and lines up with the body in a completely different place.
Perches on the body look like this. They are just glued on.
There's a little nub that centers the spring seat, looks like this.
David made these for the car in the machine shop from some scrap 6061, they center on the body in the same way as the originals, but have the right seat diameter to accept the larger diameter C900 springs.
I bolted the leading and trailing links to the body, and jacked the axle up to where I wanted it to sit to take a measurement of the installed spring height I'd need.
I decided to start with taking 2 coils off each spring to see where that got me.
Installed.
This is with jackstands under the axle so the weight of the car is on the springs, ride height looks just a touch higher than I want it, and only about 100 lbs is going back into the back of the car, so I think this worked out about perfectly.
"You can educate ignorance, but you can't fix stupid."
-
DrewP
- Posts: 2084
- Joined: Wed Dec 26, 2007 8:27 pm
- Nickname: TANK
- Number of Saabs currently owned: 1
- Location: Monrovia, CA
Re: '73 Notchback Road Racer
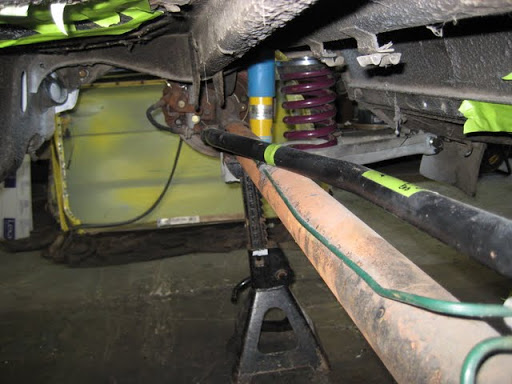
Panhard bar.
The 99 panhard rod is about 6" longer than the C900 bar, and is mounted to the axle tube rotated towards the rear of the car, and doesn't line up with the mount on the body with the C900 axle installed.
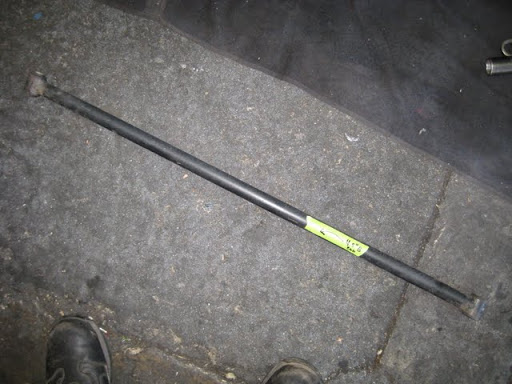
This is the C900 panhard bar, points about 2" ahead of the pickup on the body, and is about 2" too short.

Just a straight tube.
It's 1" O.D. tubing, I threw it into my bender and put a pair of kinks in it to get the bushings to line up with their respective mounts correctly:

Which gets us here, bushing lines up, but the it's still too short.
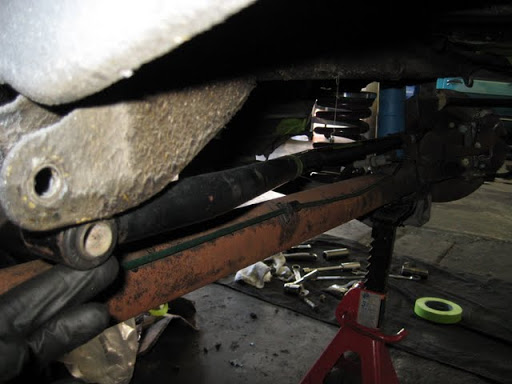
A simple sleeve should work nicely to extend this one for now.


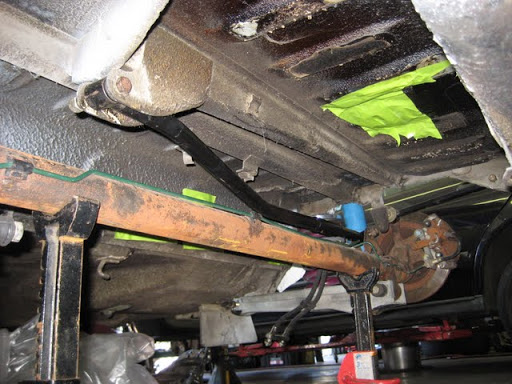
Fits fine for now. Eventually I'm sure I'll make another one that's straight but didn't have the tubing on hand.
I think the 'S' bar will be fine for road use, on a rutted gravel stage it would probably just bend at the kinks the first time one of the rear tires grabbed something during a slide.
The 99 panhard rod is about 6" longer than the C900 bar, and is mounted to the axle tube rotated towards the rear of the car, and doesn't line up with the mount on the body with the C900 axle installed.
This is the C900 panhard bar, points about 2" ahead of the pickup on the body, and is about 2" too short.
Just a straight tube.
It's 1" O.D. tubing, I threw it into my bender and put a pair of kinks in it to get the bushings to line up with their respective mounts correctly:
Which gets us here, bushing lines up, but the it's still too short.
A simple sleeve should work nicely to extend this one for now.
Fits fine for now. Eventually I'm sure I'll make another one that's straight but didn't have the tubing on hand.
I think the 'S' bar will be fine for road use, on a rutted gravel stage it would probably just bend at the kinks the first time one of the rear tires grabbed something during a slide.
"You can educate ignorance, but you can't fix stupid."
-
DrewP
- Posts: 2084
- Joined: Wed Dec 26, 2007 8:27 pm
- Nickname: TANK
- Number of Saabs currently owned: 1
- Location: Monrovia, CA
Re: '73 Notchback Road Racer
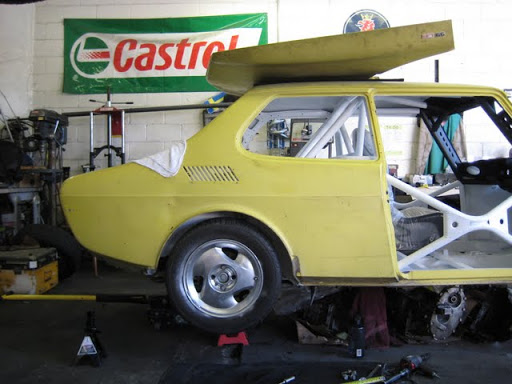
Body stuff.
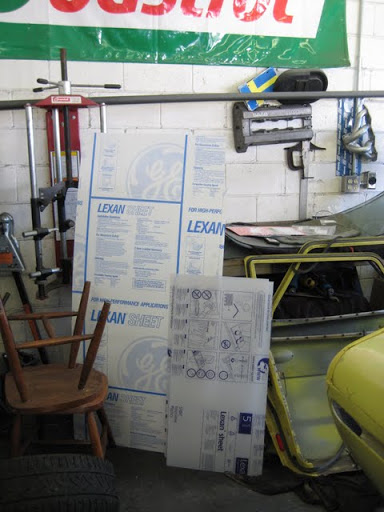
We decided to make the front and rear windscreens, and front side windows from polucarbonate window sheeting.
I found a local place that gave me a decent price on the sheeting. He'd been in the plastics business a long time, and told me that he didn't usually recommend the 'abrasion resistant' polycarb because it still wasn't really scratch-proof, and was usually significantly more expensive.
If it does get scratched up there are some plastic buffing and polishing compounds that should take some of the surface scratches out anyway, so I'll report how well this stuff holds up.
This is all 1/8th" sheeting, and we cut it on my small bandsaw with a 20 tpi metal cutting blade that's 0.035" thick. It cuts very easily.
Do NOT try to smooth the edges of polycarb with a torch or lighter, it just burns and charrs and turns black and yellow. (Acrylic sheeting [Plexiglas] is what you can heat up to smooth the edging).
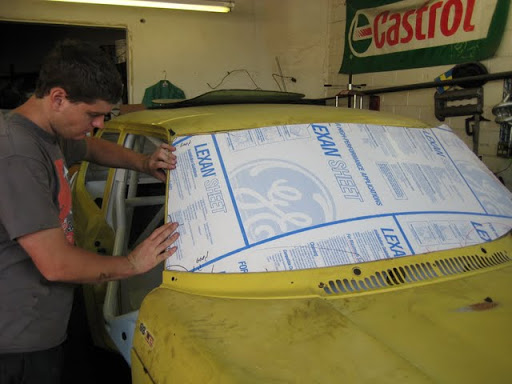
The rear window and the windshield glass actually sits about 3/8" inset from the edge of the window frame. We need it to sit flush with the edges of the frame to rivet it in.

Start by tracing the piece of glass, then we traced it again with a spacer about the right thickness to get it to fill to the edges of the frame.

A little bit of trimming, and it fits perfectly.
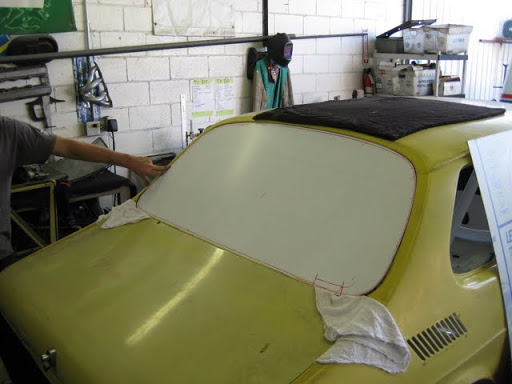
The windshield was a little trickier because I sold my 99 windshield 2 years ago, and we had to start by tracing off a C900 windscreen and then trimming it to fit. David did all the fitting for the front and rear pieces and the fit is spot on.
It's also very forgiving wrapping it around curves, it just pulls into shape, no need to heat it to get it to take a set for the curve of the windshield. Just rivet it in place.

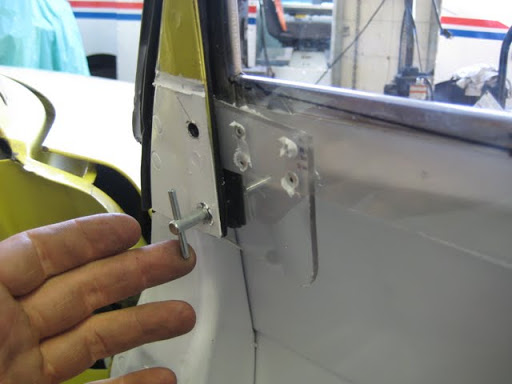
Side windows were the same idea, but I traced the actual glass windows exactly since I wanted them to sit in the tracks.


Since I cut off most of the lower window tracks to lighten the doors I'm just using a pair of quick release pins to hold the window up and seated....
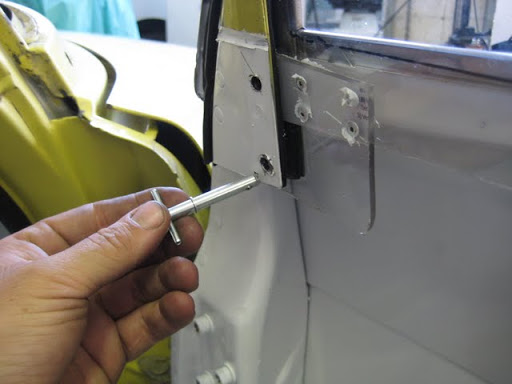
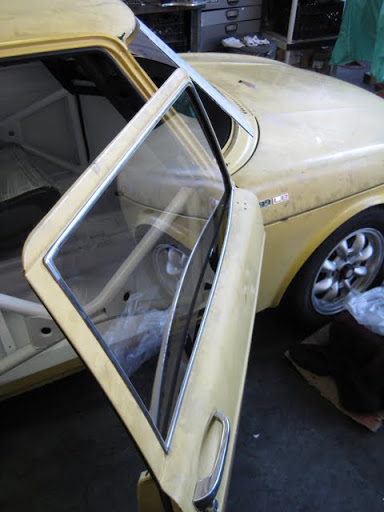
....But the glass is curved to fill out the window, and the Lexan sits like this.
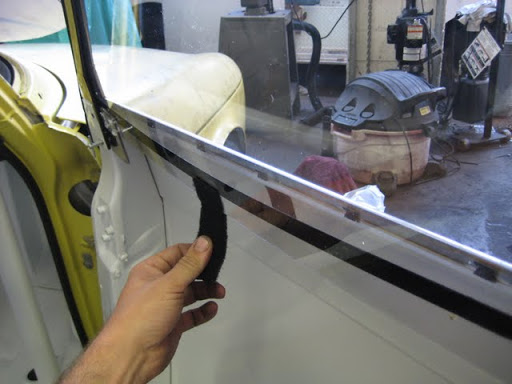
To hold it out against the wiper seals and actually keep out weather I used some adhesive backed velcro to make these straps.
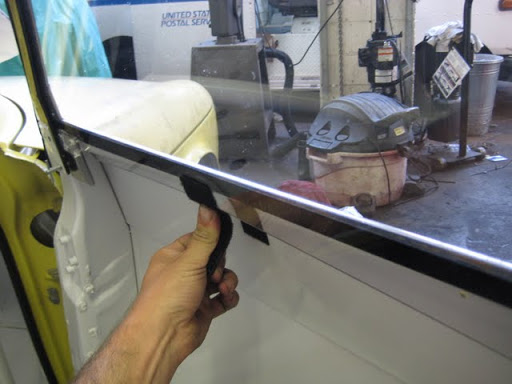
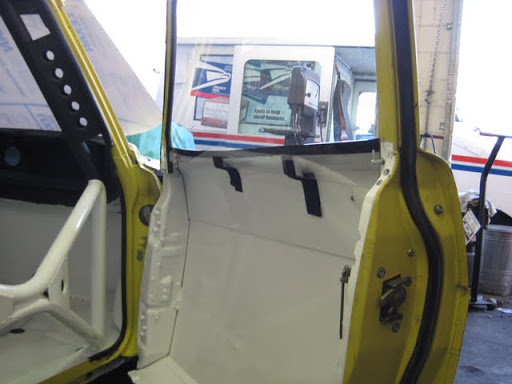
Turned out pretty good!

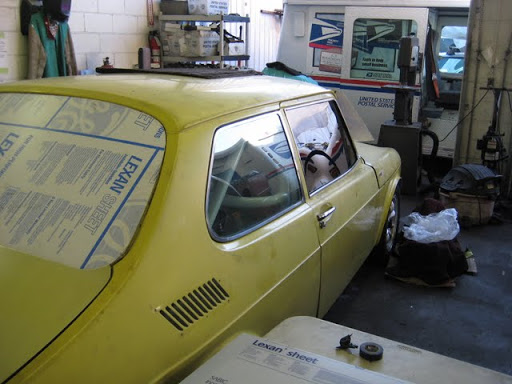
We decided to make the front and rear windscreens, and front side windows from polucarbonate window sheeting.
I found a local place that gave me a decent price on the sheeting. He'd been in the plastics business a long time, and told me that he didn't usually recommend the 'abrasion resistant' polycarb because it still wasn't really scratch-proof, and was usually significantly more expensive.
If it does get scratched up there are some plastic buffing and polishing compounds that should take some of the surface scratches out anyway, so I'll report how well this stuff holds up.
This is all 1/8th" sheeting, and we cut it on my small bandsaw with a 20 tpi metal cutting blade that's 0.035" thick. It cuts very easily.
Do NOT try to smooth the edges of polycarb with a torch or lighter, it just burns and charrs and turns black and yellow. (Acrylic sheeting [Plexiglas] is what you can heat up to smooth the edging).
The rear window and the windshield glass actually sits about 3/8" inset from the edge of the window frame. We need it to sit flush with the edges of the frame to rivet it in.
Start by tracing the piece of glass, then we traced it again with a spacer about the right thickness to get it to fill to the edges of the frame.
A little bit of trimming, and it fits perfectly.
The windshield was a little trickier because I sold my 99 windshield 2 years ago, and we had to start by tracing off a C900 windscreen and then trimming it to fit. David did all the fitting for the front and rear pieces and the fit is spot on.
It's also very forgiving wrapping it around curves, it just pulls into shape, no need to heat it to get it to take a set for the curve of the windshield. Just rivet it in place.
Side windows were the same idea, but I traced the actual glass windows exactly since I wanted them to sit in the tracks.
Since I cut off most of the lower window tracks to lighten the doors I'm just using a pair of quick release pins to hold the window up and seated....
....But the glass is curved to fill out the window, and the Lexan sits like this.
To hold it out against the wiper seals and actually keep out weather I used some adhesive backed velcro to make these straps.
Turned out pretty good!
"You can educate ignorance, but you can't fix stupid."
Re: '73 Notchback Road Racer
Wow, great work :rally:
Return to “Projects and Build Threads”
Who is online
Users browsing this forum: No registered users and 16 guests