Project Loki - 1988 classic SAAB turbo

A place for long term threads surrounding a specific project or SAAB build for motorsports or restoration
User avatar
squaab99t
Posts: 1270
Joined: Wed Mar 28, 2007 5:43 pm
Number of Saabs currently owned: 4
Location: Shoreline Wa

Re: Project Loki - 1988 classic SAAB turbo

Postby squaab99t » Sat Dec 01, 2012 2:42 pm

This is what I did on the '89 900. Rally hockey pucks. Notice the oversized hole so the bolt ends up bushed and not transmitting vibration to the aluminum plate. The plate is 1/4 inch.
Tough, durable, and cheap... All very fitting for Saab owners.
Having an engine lathe makes short order of getting the right stack height. If not a hack saw, drill and a belt sander will get you there.
CIMG1877.JPG

CIMG1876.JPG

User avatar
Geoff
Team Turbo Troll Crew
Posts: 3892
Joined: Fri Oct 20, 2006 3:31 pm
Nickname: Geoff
Number of Saabs currently owned: 6
Location: Nude Humpshire

Re: Project Loki - 1988 classic SAAB turbo

Postby Geoff » Sun Dec 02, 2012 12:30 am

Hockey pucks are what were used by the factory rally team :thumbsup:

The RHS mounts seem to go bad more often than the LHS. Probably because of the exhaust heat and fluids getting spilled there.
The kind of dirty that doesn't wash off :eyebrows:

Adrian Thompson
Posts: 170
Joined: Mon Mar 12, 2012 10:14 am
Number of Saabs currently owned: 1

Re: Project Loki - 1988 classic SAAB turbo

Postby Adrian Thompson » Sun Dec 09, 2012 5:49 pm

Well I went for the Energy suspension bushing not the hockey.

In true DIY/GRM/cheapskate fasion I spent the last 3 hours saving myself $50-70 buy building not buying a new engine mount. The not so amazing results are shown below. Now that may look like just a simple rectangle of aluminum with three holes in it too you, but it is in fact, eerr well a rectangle of aluminum with three holes in it. But it's a rectangle I'm very proud of. I didn't have anything to cut alloy, so I headed over to my father in laws to borrow his mill, I had to mount the alloy plate virticaly then cut it off, in three stages as the bit I was using was too tall. Then I had to cut to length, swap heads and drill the holes in stages. All in all, including clean up afterwards that little rectangle cost me about 2 1/2 hours work, just to save a few $$'s But more importantly I got to play with some tools, BS with my FIL and avoid the holiday cooking fest my wife was having with some friends and my mother, although I did miss out on the three bottles of champaign they drank too!Image
Image
Image
So, once I've hit a few spots in the engine bay with POR15 I can put it back together and see what the improvement is in shifting.
Project Loki - 88 900C - future TSD, Rallycross and track day toy

Adrian Thompson
Posts: 170
Joined: Mon Mar 12, 2012 10:14 am
Number of Saabs currently owned: 1

Re: Project Loki - 1988 classic SAAB turbo

Postby Adrian Thompson » Wed Dec 12, 2012 6:37 pm

How is the battery try retained in the car? I looks like there are three fasteners, one at the front vertically on the front cross member and two horizontaly down into the inner wing from a bracket on the tray. Are they meant to be bolts or rivets? Two appear to be missing, but it's still tight. I want to remove it, de rust everything, paint and reassemble. I also need to add a battery tie down as that's missing.

Thanks
Project Loki - 88 900C - future TSD, Rallycross and track day toy

DeLorean
Posts: 1193
Joined: Sat Mar 31, 2007 9:54 pm
Number of Saabs currently owned: 9
Location: Pennsylvania, Forever!
Contact:

Re: Project Loki - 1988 classic SAAB turbo

Postby DeLorean » Wed Dec 12, 2012 7:23 pm

The battery is bolted down with 10MM bolts. Just un bolt it from below it will come right out.
Less brake more gas!

Adrian Thompson
Posts: 170
Joined: Mon Mar 12, 2012 10:14 am
Number of Saabs currently owned: 1

Re: Project Loki - 1988 classic SAAB turbo

Postby Adrian Thompson » Wed Dec 12, 2012 9:00 pm

Great, I'll try harder, Thanks!!
Project Loki - 88 900C - future TSD, Rallycross and track day toy

DeLorean
Posts: 1193
Joined: Sat Mar 31, 2007 9:54 pm
Number of Saabs currently owned: 9
Location: Pennsylvania, Forever!
Contact:

Re: Project Loki - 1988 classic SAAB turbo

Postby DeLorean » Wed Dec 12, 2012 11:25 pm

the battery TRAY that is. If there is any extra undercoat you may have to pick it off to actually find the bolts.
Less brake more gas!

User avatar
SwedeSport
Posts: 3021
Joined: Mon Jun 15, 2009 9:52 am
Number of Saabs currently owned: 5
Location: Pottstown, PA
Contact:

Re: Project Loki - 1988 classic SAAB turbo

Postby SwedeSport » Fri Dec 14, 2012 12:25 pm

Good time to put the battery in the trunk, and make room for more downpipe.
Swedesport Motors, Apparel and Accessories for SAAB Junkies.
Http://Facebook.com/swedesportmotors
Swedesportmotors@gmail.com

Adrian Thompson
Posts: 170
Joined: Mon Mar 12, 2012 10:14 am
Number of Saabs currently owned: 1

Re: Project Loki - 1988 classic SAAB turbo

Postby Adrian Thompson » Mon Jan 07, 2013 9:36 am

No, this isn’t one of those build threads where the car is bought, posted and never heard from again. Something has been happening since I built the engine mount, it’s just been happening slowly. I was sick most of the holidays which sucked, but I have been doing bits in dribs and drabs and we’re now back on the road.

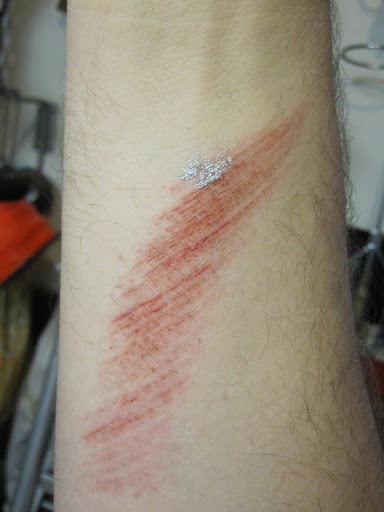
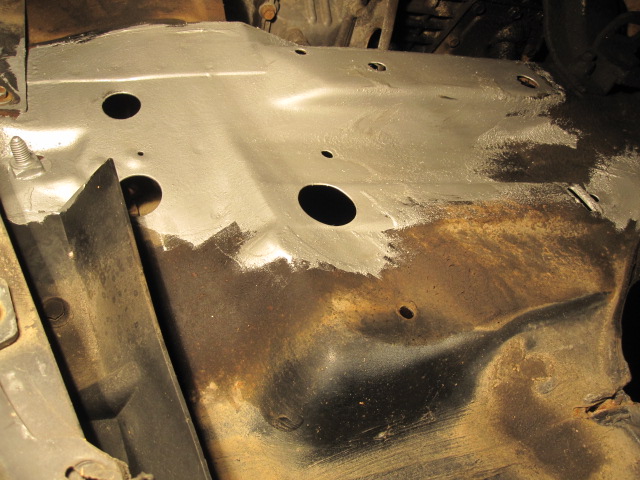
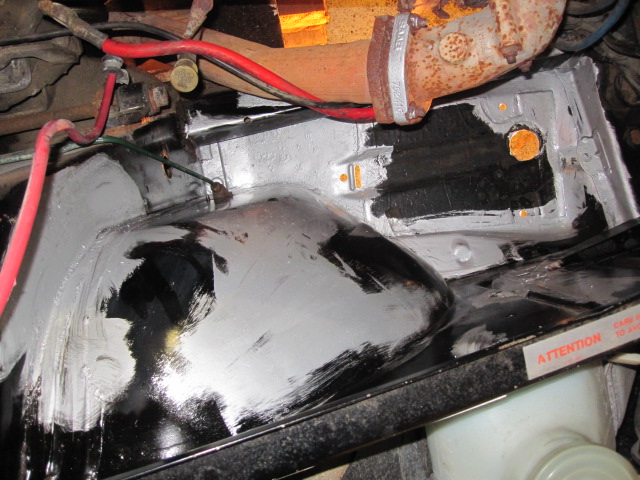
While I had bits out to reach the engine mount I decided to clean them up and some of the surface rust around the engine bay. So out with the hot soapy water, then the wire cup attachment on the angle grinder, clean it, apply rust bullet then black rustoleum. Unfortunately while hitting the underside the angle grinder caught on an edge and threw itself at my arm, tore through my cloths and gave me serious defoliation. The pic below is a couple of days later, it hurt like a bugger. :bawl:
Image
Image
Image

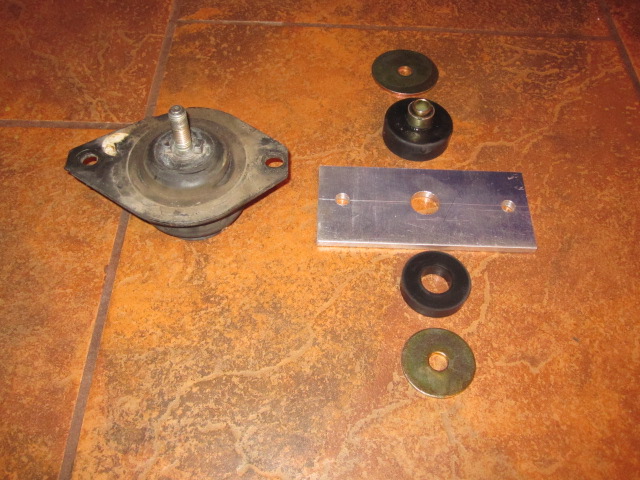
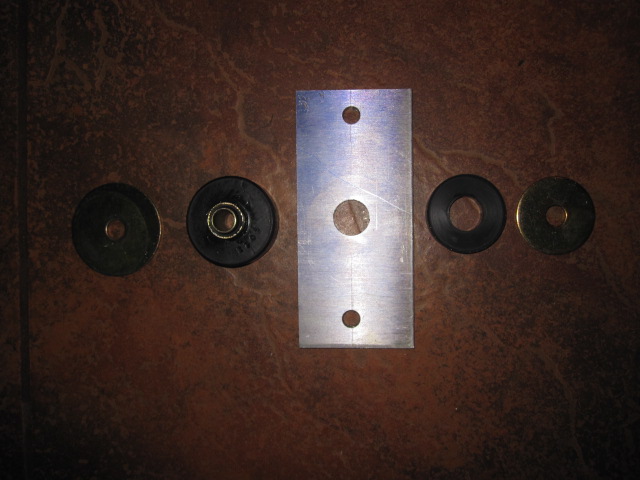
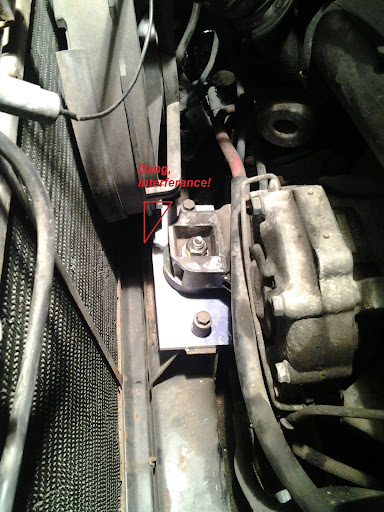
So when it was time to start putting things back together I discovered a really good reason I should have shaped my engine mount rather than made it square. In its original form it wanted to occupy the same space as the right hand radiator fan. Bugger. I didn’t discover this until the engine was being supported by the mount and the blocks, jack etc. removed. Well I could have taken it out again, but I wouldn’t have had anything handy to cut it with even then (I made it in my father in laws workshop) so I just grabbed a hack saw blade (just the blade) and spent 45 mins cutting the corner off in situ. Then it was just put everything back together.
Image

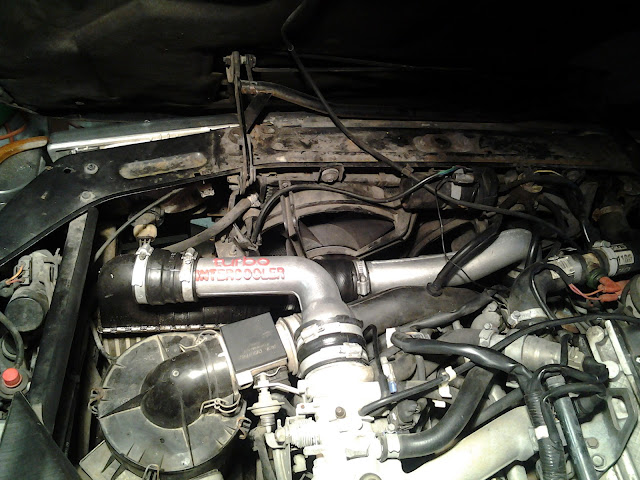
While everything was out I’d blinged up the intercooler pipes a bit by cleaning the old paint and grime off, so then I had to throw some pretty red paint at the lettering.
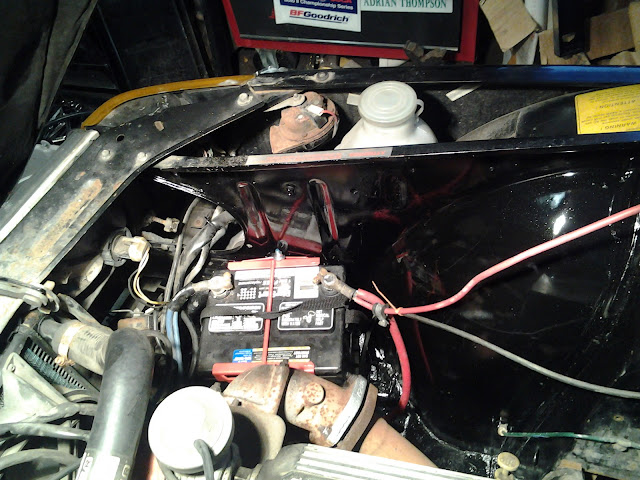
Now I’d found that the battery had nothing to hold it in place, it was just sitting on the tray, retained by the cables. I went rooting through the piles of shit I’ve never thrown away and found an old battery top clamp (the red bit below) so I got some ¼” studding, nuts bolts and washers, drilled a couple of holes and used that. Now Swedesport had been recommended that I move the battery to the trunk or under the rear seat, I wish I’d done it now as the clamp is just about touching the turbo outlet elbow and I don’t like it as a long term solution. The thing is the current batter works so I don’t want to buy a new gel cell while this one is good and I don’t want to put a lead acid in the passenger compartment because out gassing.
Image
Image

So, it’s all back together except for the sump guard which I’ll leave off until I’ve pressure washed the engine bay and one of the horns that I can’t figure out where it attaches. So, it doesn’t look much different from before, but it’s back together and running again.

Impressions, well 2nd gear syncro didn’t magical repair itself, but it’s approx. 1,000,000% better than before. It’s much easier to drive now, no clunking and lurching, I just have to rev match down shifts and take it slow upshifting, I wish I had a light weigh flywheel :thumbsup: So here it is, running again, I popped down to the gas station to throw in a few gallons, I must get the title transferred and registered soon :lol:

So next on the list is straight back into the garage and start on the interior and gear shift. I plan on pulling out the seats and carpets to start with. I’ll clean and dye it, then work on fitting the cloth seats I’ve got for it. The other thing I want to do is sort out the seat belts, the car has the god awful rat trap seat belts. There are instructions online for retro fitting regular three point belts, the mounts are still there, but I don’t like the thought of fitting 20-30 year old junk yard belts. Online there are various manufactures of aftermarket inertia real belts, does anyone have experience of these?
Image
Project Loki - 88 900C - future TSD, Rallycross and track day toy

Hans
Posts: 442
Joined: Thu Nov 09, 2006 6:50 pm
Number of Saabs currently owned: 2
Location: Rain City

Re: Project Loki - 1988 classic SAAB turbo

Postby Hans » Mon Jan 07, 2013 8:29 pm

Nice to see some progress. Awesome wound, too :-)

I'm concerned about your battery - without the heatshield it can melt - I nearly did this when I converted a non turbo and decided to drive it without the shield. That elbow gets plenty hot.

User avatar
Geoff
Team Turbo Troll Crew
Posts: 3892
Joined: Fri Oct 20, 2006 3:31 pm
Nickname: Geoff
Number of Saabs currently owned: 6
Location: Nude Humpshire

Re: Project Loki - 1988 classic SAAB turbo

Postby Geoff » Mon Jan 07, 2013 10:40 pm

"My fellow SAAB wrenchers, I feel your pain."
ouch.jpg
ouch.jpg (81.93 KiB) Viewed 3972 times


I wear a full face shield now instead of just goggles. If it can do that to my leg that quickly I don't want it to hit my face.

Using the second handle on the angle grinder helps keep it more stable but the biggest thing is keeping the wire wheel away from edges.
The kind of dirty that doesn't wash off :eyebrows:

User avatar
SwedeSport
Posts: 3021
Joined: Mon Jun 15, 2009 9:52 am
Number of Saabs currently owned: 5
Location: Pottstown, PA
Contact:

Re: Project Loki - 1988 classic SAAB turbo

Postby SwedeSport » Tue Jan 08, 2013 12:25 am

Never use the throttle lock. I had on flip flops and had a cut off wheel on mine. I was trying to cut something and dropped it. I didnt get hurt but sure did dance around a bit trying to keep my toes and get to the plug.
Swedesport Motors, Apparel and Accessories for SAAB Junkies.
Http://Facebook.com/swedesportmotors
Swedesportmotors@gmail.com

User avatar
Jordan
Site Admin
Posts: 4068
Joined: Fri Oct 13, 2006 2:38 pm
Number of Saabs currently owned: 6
Location: Vernon, CT
Contact:

Re: Project Loki - 1988 classic SAAB turbo

Postby Jordan » Tue Jan 08, 2013 8:58 am

SwedeSport wrote:Never use the throttle lock. I had on flip flops and had a cut off wheel on mine. I was trying to cut something and dropped it. I didnt get hurt but sure did dance around a bit trying to keep my toes and get to the plug.


I think the moral of that story should be "Never wear flip-flops" :lol:

User avatar
SwedeSport
Posts: 3021
Joined: Mon Jun 15, 2009 9:52 am
Number of Saabs currently owned: 5
Location: Pottstown, PA
Contact:

Re: Project Loki - 1988 classic SAAB turbo

Postby SwedeSport » Tue Jan 08, 2013 9:49 am

Jordan wrote:
SwedeSport wrote:Never use the throttle lock. I had on flip flops and had a cut off wheel on mine. I was trying to cut something and dropped it. I didnt get hurt but sure did dance around a bit trying to keep my toes and get to the plug.


I think the moral of that story should be "Never wear flip-flops" :lol:


They have gotten me in trouble with the welder too...
Swedesport Motors, Apparel and Accessories for SAAB Junkies.
Http://Facebook.com/swedesportmotors
Swedesportmotors@gmail.com

Adrian Thompson
Posts: 170
Joined: Mon Mar 12, 2012 10:14 am
Number of Saabs currently owned: 1

Re: Project Loki - 1988 classic SAAB turbo

Postby Adrian Thompson » Tue Jan 08, 2013 9:57 am

Hhmm, strange, lost reply, let's try again.

Good idea on using the second handle on the angle grinder, I removed it years ago as I never felt I needed it. To tell the truth it's currently doing duty as the handle/trigger on my spud gun as seen below ;)
Image

FYI, I was wearing a full face shield and full clothing with boots, it is winter in Michgan afterall. It just ripped out of my hands, no lock on, but was still turning fast enough to tear through three layers of cloths and defoleate me. I've agreed with SWMBO that I wont use it when alone at the house just in case.
Project Loki - 88 900C - future TSD, Rallycross and track day toy


Return to “Projects and Build Threads”

Who is online

Users browsing this forum: No registered users and 4 guests