Project Loki - 1988 classic SAAB turbo

A place for long term threads surrounding a specific project or SAAB build for motorsports or restoration
Adrian Thompson
Posts: 170
Joined: Mon Mar 12, 2012 10:14 am
Number of Saabs currently owned: 1

Seat belt quandry.

Postby Adrian Thompson » Tue Jan 08, 2013 10:02 am

Does anyone have experience with aftermarket seat belts like these?

http://www.seatbeltsplus.com/category/3 ... Belts.html
Image

Being an 88 I have the god awful rat trap belts. I’ve seen online where I can retro fit pre 88 or post 90 belts, but to tell the truth I don’t want to fit 20-30 year old belts. Anything wrong with something like these? I assume they’d bolt in to the stock mountings which are still there I believe. I’m swapping seats at the same time to some earlier C900 velour seats that thankfully don’t have the horrible belts on them.
Project Loki - 88 900C - future TSD, Rallycross and track day toy

User avatar
Geoff
Team Turbo Troll Crew
Posts: 3891
Joined: Fri Oct 20, 2006 3:31 pm
Nickname: Geoff
Number of Saabs currently owned: 6
Location: Nude Humpshire

Re: Project Loki - 1988 classic SAAB turbo

Postby Geoff » Tue Jan 08, 2013 1:11 pm

Retractable belts can sometimes be a pain when installing because, in my experience, they can be very sensitive to mounting position. They're only designed to be mounted one way, otherwise the retractors will lock. It looks like if you used one of the hardware kits (specifically the angle brackets) you could mount it and it would work fine.
Image

The buckle you picked out is very similar to the stock 900 but I'd get one with a cool or strange buckle. 99s have funny seat belts that some people have a hard time figuring out, we call them "The SAAB Intelligence Test". It's always puts a smile on your face to watch people figure something out that they're not used to :P

This one looks like the airliner belt buckles
Image

Muscle car
Image

Awesome '80s
Image
The kind of dirty that doesn't wash off :eyebrows:

User avatar
Geoff
Team Turbo Troll Crew
Posts: 3891
Joined: Fri Oct 20, 2006 3:31 pm
Nickname: Geoff
Number of Saabs currently owned: 6
Location: Nude Humpshire

Re: Project Loki - 1988 classic SAAB turbo

Postby Geoff » Tue Jan 08, 2013 10:20 pm

Jordan wrote:I think the moral of that story should be "Never wear flip-flops" :lol:


Image
The kind of dirty that doesn't wash off :eyebrows:

User avatar
SwedeSport
Posts: 3021
Joined: Mon Jun 15, 2009 9:52 am
Number of Saabs currently owned: 5
Location: Pottstown, PA
Contact:

Re: Project Loki - 1988 classic SAAB turbo

Postby SwedeSport » Tue Jan 08, 2013 10:35 pm

Amen Brutha!
Swedesport Motors, Apparel and Accessories for SAAB Junkies.
Http://Facebook.com/swedesportmotors
Swedesportmotors@gmail.com

Adrian Thompson
Posts: 170
Joined: Mon Mar 12, 2012 10:14 am
Number of Saabs currently owned: 1

Re: Project Loki - 1988 classic SAAB turbo

Postby Adrian Thompson » Tue Jan 15, 2013 1:36 pm

OK, mini update as I didn’t take any pics, I got a couple of hours on the car yesterday. First though, miracle of miracles SWMBO drove the car yesterday morning, and still doesn’t hate it!! It was an unintended master stroke to buy a car she likes the styling of rather than an E30 or something :) She managed to shift up into 2nd slowly without crunching and somehow managed to avoid changing down to second, instead taking corners in 3rd, then coasting to stops and selecting 1st instead. At some time I will need either a new box, or to rebuild this one to sort out the total lack of syncro.

I got the interior out of the Saab, everything except the headliner and A. B. C pillar trim pieces and the dash. It was very easy actual, just a couple of hours work for the whole thing. The carpet comes out in two parts which was great, I vacuumed the front half then ran it through the washing machine :) It kept its shape, but didn't get very much cleaner, there's some seriously ground in dirt. I think I might do that a couple more times then call it good enough to dye. Either that or wait for another nice day then out with the simple green and pressure washer. There were no nasty surprise yet, but I haven't removed the insulation to check the floor pan, that will be on the list.


I'm trying to work out what to do about the dash, it's in bad shape, here’s an older pic.

Image

I’ve heard the horror stories from a friends’s E30 build and I’m hesitant to pull the whole thing for repair and/or flocking. I may pull the instrument binnacle and try to repair that out of the car, then I'm thinking of ways to repair or bodge the dash in situe. Possible pull the screen, grind out and fill the cracks then paint in the car with the screen removed? I've also had a great but crazy idea for the headliner, parcel shelf and door inserts. Trying to help match the dark blue of the replacement velour seats I have with the other stuff I'll paint black without making it a coffin in there. Black Watch Tartan (I can't call it paid, that's a garment no the pattern, yes I'm a pedant ) That color of tartan has black, dark blue and gray in it to help tie everything together. It would also be awesomely crazy in a fun kind of way. ;) :crazy: :yay: :crazy: ;)

Image
Project Loki - 88 900C - future TSD, Rallycross and track day toy

User avatar
Geoff
Team Turbo Troll Crew
Posts: 3891
Joined: Fri Oct 20, 2006 3:31 pm
Nickname: Geoff
Number of Saabs currently owned: 6
Location: Nude Humpshire

Re: Project Loki - 1988 classic SAAB turbo

Postby Geoff » Tue Jan 15, 2013 1:47 pm

Adrian Thompson wrote:Image

:barf:
That stuff on the headliner will make the interior feel real dark.

The dash comes out pretty easily so you can pull it if you like. I just say live with the cracks because it is a C900 afterall! :lol:
The kind of dirty that doesn't wash off :eyebrows:

User avatar
RadioFlyer
Posts: 918
Joined: Wed Oct 05, 2011 11:08 am
Nickname: RadioFlyer
Number of Saabs currently owned: 7
Location: Utah

Re: Project Loki - 1988 classic SAAB turbo

Postby RadioFlyer » Tue Jan 15, 2013 4:19 pm

Looks almost as bad as my 1980 900t dash! I filled it and coated with bedliner. And it cracked again. Tried filling again and it cracked again. I'm of the mindset now that the only ones that will really turn out right after a fill are ones with only small cracks - the small cracks that I filled turned out great and have not returned to crack. My plan C is to cover the dash with vinyl fabric. I did that on an '87 SPG once and it turned out great! Here's a pic from 3 years after the covering - the dirtbag who bought the car from me abused it, crashed it, never paid me for it and left it to his sister after telling her he got it for free. The sister drove it like a teenage girl, left hair ties and mardigras beads all over the interior (reeked of nailpolish remover), rolled it over a bank when it was parked without the e-brake - it crashed into a fence, and then rusted it out and left it behind a barn to rot. That's when I finally tracked it down and took it back. Anyway, to my surprise, the dash looked exactly the same 3 years after the repair. Held up great!!!! I highly suggest it.
Image

Adrian Thompson
Posts: 170
Joined: Mon Mar 12, 2012 10:14 am
Number of Saabs currently owned: 1

Re: Project Loki - 1988 classic SAAB turbo

Postby Adrian Thompson » Wed Jan 16, 2013 7:21 am

That's great thanks, I had seen this in your build thread. How hard is it to pull the dash? Also any tips on fixing the instrament binacle surface? It's plastic with a slight raised lip around the edge, then there's a padded material inlaid. That's cracking and lifting.
Project Loki - 88 900C - future TSD, Rallycross and track day toy

User avatar
RadioFlyer
Posts: 918
Joined: Wed Oct 05, 2011 11:08 am
Nickname: RadioFlyer
Number of Saabs currently owned: 7
Location: Utah

Re: Project Loki - 1988 classic SAAB turbo

Postby RadioFlyer » Wed Jan 16, 2013 8:52 am

The dash is actually pretty easy to take out. Things to be careful of are the order of the wires behind the dash fascia (the binnacle that you are asking about). They need to be reinstalled in the correct Arrangement or your climate control will not work right. I just write it down as I remove them - (top) purple- blank - white - space - blank - yellow - purple - grey- purple - space (bottom). Something like that. Other than that, it's pretty easy and doesn't take very long. The only hard part of the upper dash is getting the little wires on the far passenger side plugged back in behind the dash when you put it back in. Also take note of those.

Repairing the stick-on face on the fascia is something that I have never had much luck with. No glue known to man works well except the original 3M stuff. Ive thpught about aftermarket stick on wood dash kits, but they sometimes look pretty shoddy. I've always just grabbed good spares as I find them and used those. If you need one, I'm happy to let one go for cheap.

User avatar
Crazyswede
Team Turbo Troll Crew
Posts: 4540
Joined: Fri Sep 22, 2006 3:53 pm
Nickname: Mongo
Number of Saabs currently owned: 97
Location: Vermont
Contact:

Re: Project Loki - 1988 classic SAAB turbo

Postby Crazyswede » Wed Jan 16, 2013 8:58 am

can you fill the crack with black caulk :-O Maybe dig it out a bit and then fill it with the caulk then cover the surface with that glue on suede stuff that eludes me at the moment?

Disclaimer, there is absolutely no comedic material in this post. :rolleyes:
I am the 73%

User avatar
SwedeSport
Posts: 3021
Joined: Mon Jun 15, 2009 9:52 am
Number of Saabs currently owned: 5
Location: Pottstown, PA
Contact:

Re: Project Loki - 1988 classic SAAB turbo

Postby SwedeSport » Wed Jan 16, 2013 12:25 pm

I had always thought that the way to do it would be to fill it with an epoxy mix. First sand down or cut off the portion of the vinyl cover that is curled up. Then you have to hog the crack out slightly deeper into the foam. On cracks that stop in the panel, drill a small round hole to relieve the stress then cut the crack into one side of the hole. There is a product called Cabosil that you can mix into liquid epoxy resin to thicken it. It's easier to manage the thicker resin as it doesn't run or want to self level as much.

Sand out the epoxy and smooth it back to slightly below level. Then use a flexible automotive bumper repair filler. Feather that out and smooth it to level.

Then you can wrap it with new vinyl, or leather. Some of the Bedliner sprays could work. Or you could find someone that can flock the dash for an interesting look.

Another tip, ... due to people's perpensity to soak the shit out of interiors with armor all, or other interior protectants, clean the dash with a strong degreaser to remove contaminants before trying to glue it together. It would certainly improve the bond on the dissimilar materials.
Swedesport Motors, Apparel and Accessories for SAAB Junkies.
Http://Facebook.com/swedesportmotors
Swedesportmotors@gmail.com

Adrian Thompson
Posts: 170
Joined: Mon Mar 12, 2012 10:14 am
Number of Saabs currently owned: 1

Re: Project Loki - 1988 classic SAAB turbo

Postby Adrian Thompson » Mon Mar 04, 2013 11:50 am

Crap, 7 weeks without progress!!!! Well after the last mini write up, the car was outside, Most of the interior was in the garage, then workmen came and dumped more stuff in the garage for repairing the chimney and doing some brick work, then more snow, guests, vacation….. Progress stopped. Not totally as I did clean all the interior panels then clean and re-dye the carpets, but I’ve got no pics of that, not that it’s very interesting.
So, vacation over, visitors gone, workmen basically finished, most of the snow has gone and no other commitments meant that I finally got out for a couple of hours yesterday.
Image 
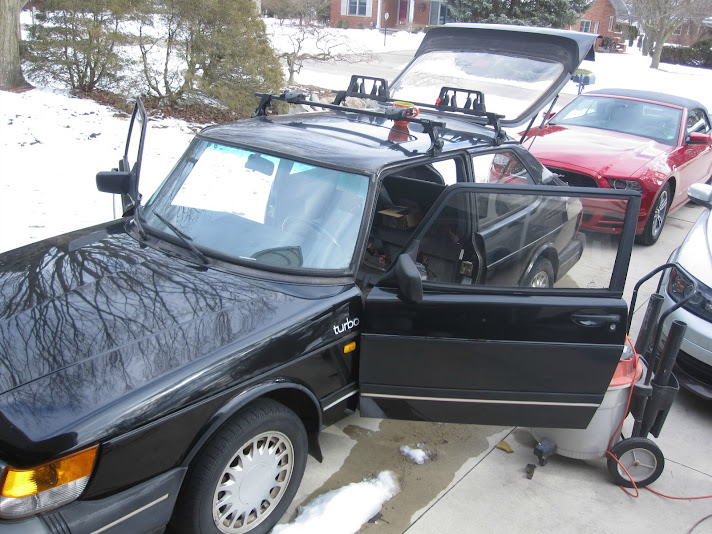
Work at last, note I said most of the snow had gone, not all of it.

No I didn’t achieve much, basically clear a car size hole in the garage, sweep up a bit then clean out the car. When I pulled out the interior and panels it was pretty groaty in there with 25 years’ worth of stuff getting under seats, through the consul etc. I hit the car hard with the shop vac and a stiff paint brush to dislodge years of compacted dirt. Much better to see what there is. There was some water in the footwells and the rear under floor spare tire, tool area had standing water. Everything is now dried out and the car is in the garage with an 80+ year old Sears brand de-humidifier inside sucking out every drop of water. I did pull off the rear hatch trim and get the external hatch release working, although I had to disable the hook from the key/solenoid to do so. The key doesn’t fit and I don’t know where the internal hatch release button should be. So not much real progress, but it was a couple of hours out there and a lot of think time.
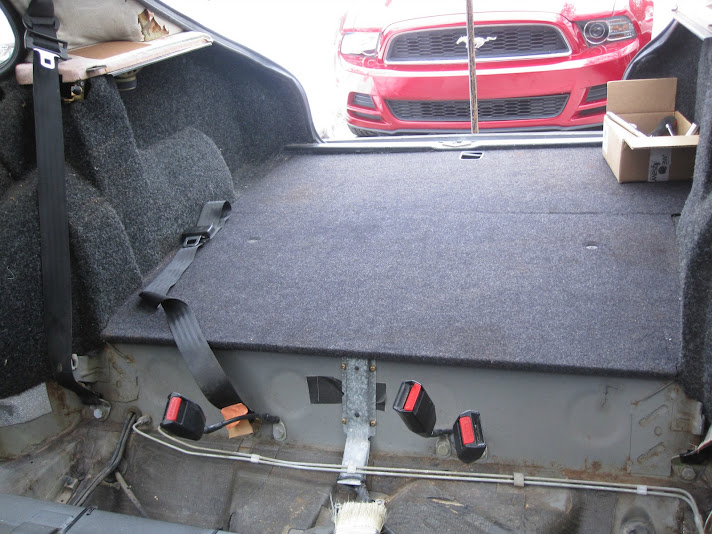
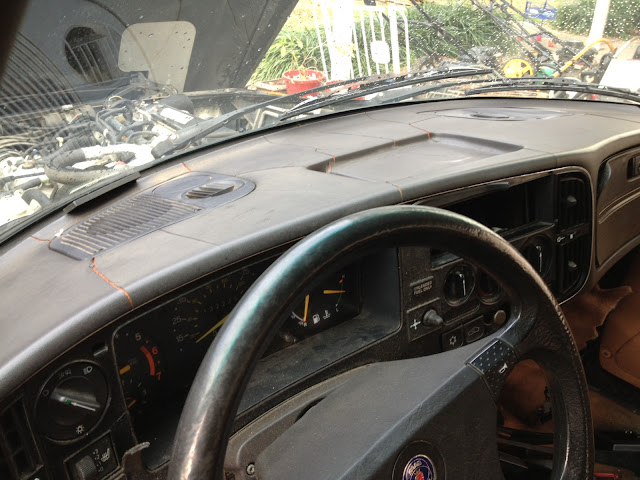
This is what the interior currently looks like.

Image 
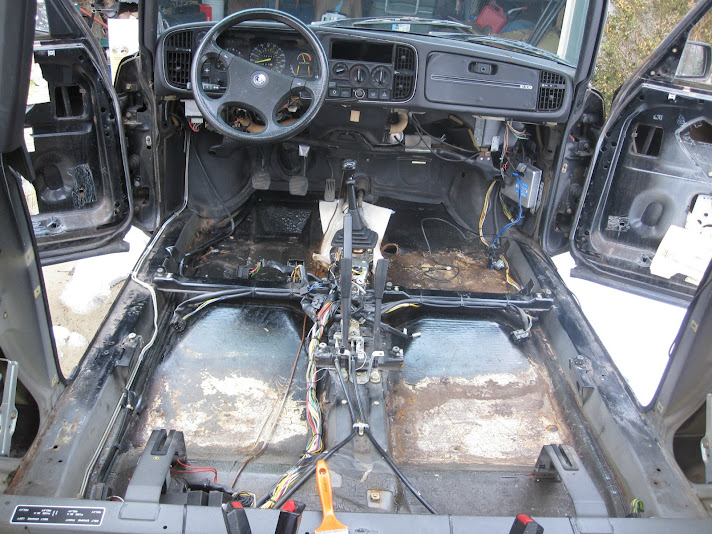
Interior looking forwards, the brown is not rust, it’s paint that’s come of the sound deadening mat that looks dirty
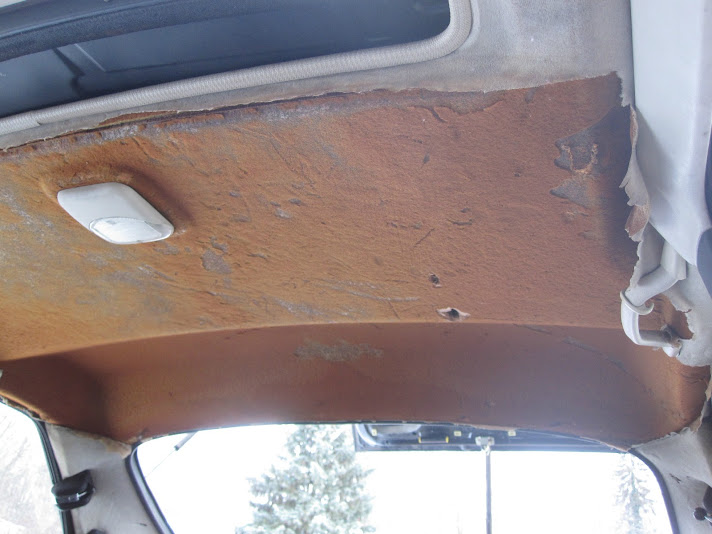
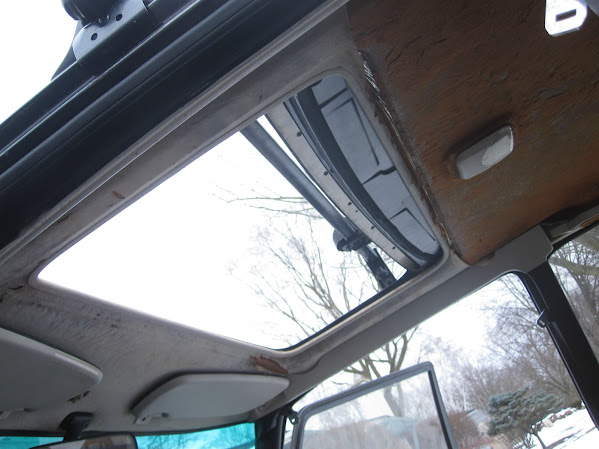
Image Looking back

Image 
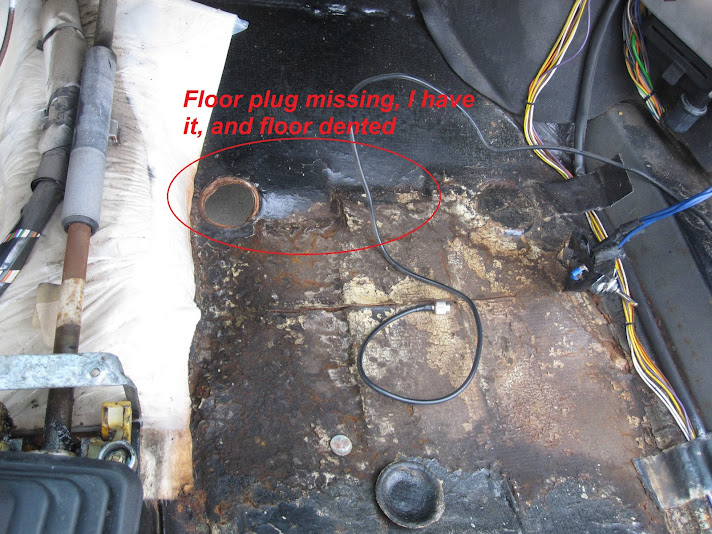
passenger side floor had a big dent and the drain plug has come out. Time for a big block of wood and BFG hammer.

Image 
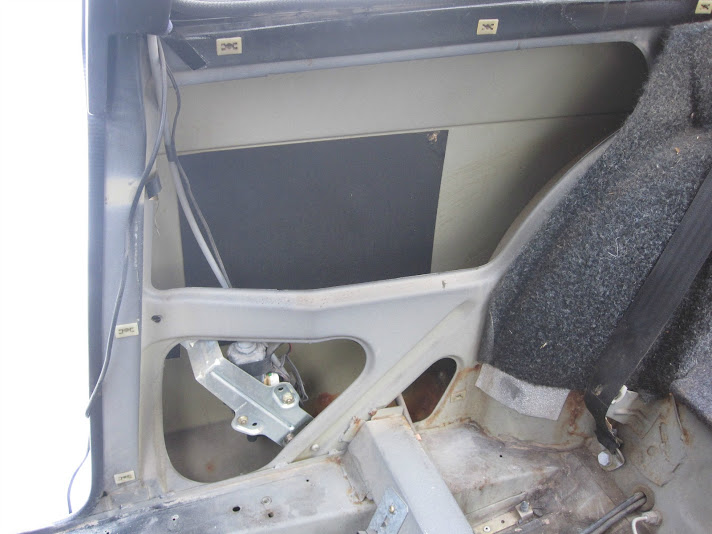
Drivers side next to the rocker panel, there is a crease and some surface rust, I didn’t see anything underneath, I hope if I hit it with the angle grinder and wire brush attachment I’ll find it’s also solid, BFG and wood time again then hit it with rust bullet. I hope I don’t need to do any welding here.

Image 
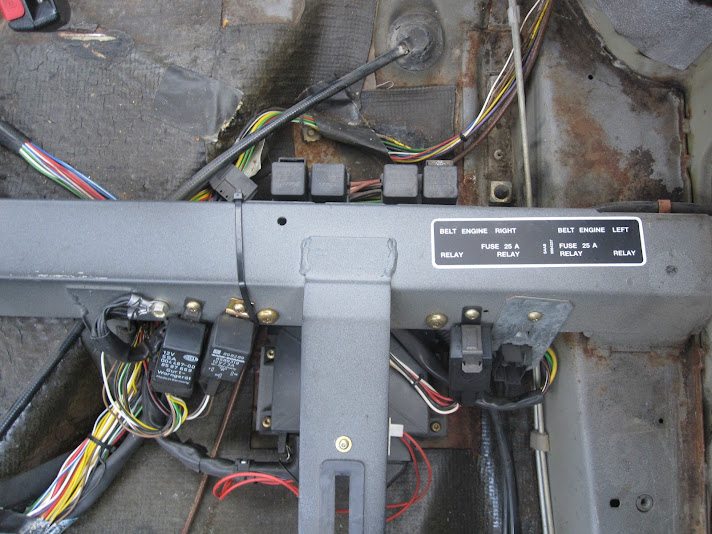
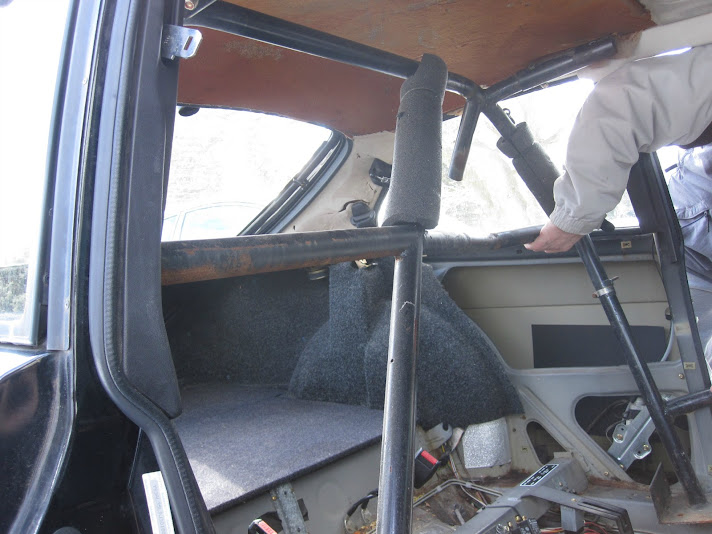
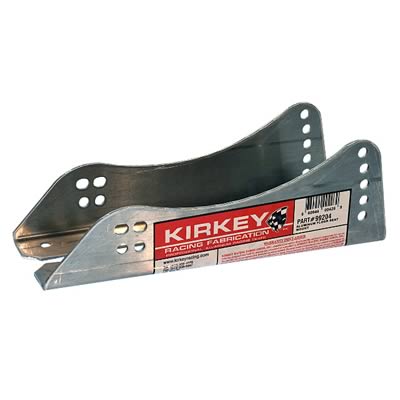
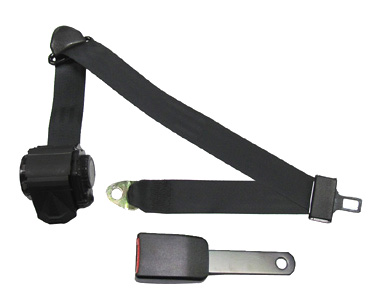
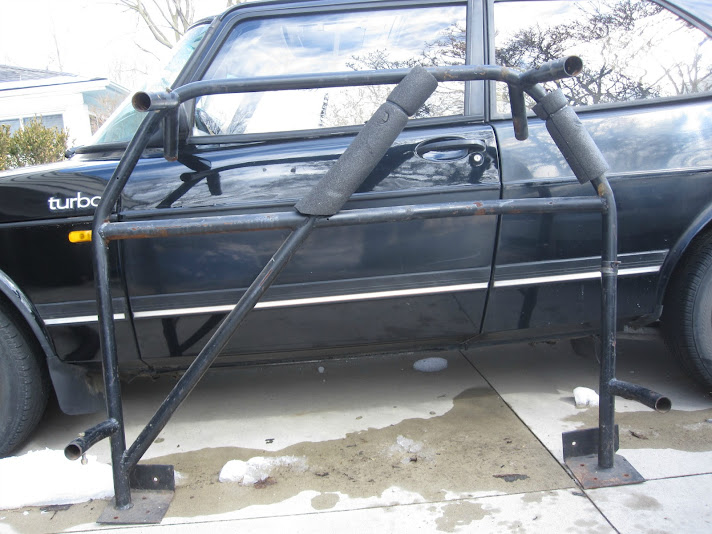
I need to check what I can get rid of here, I hope it can all go as I’m getting rid of the nonfunctional rat trap seatbelts and replacing with regular 3 point or 5 point, more on that in the next post.

Image This is the rat trap seat belt mechanism itself to be removed. I’ve been told that the lower mount is still here for regular 3 point belts as they were still used In the rest of the world at this time, but I’m not sure which or where that is, can someone help out with that?

Image 
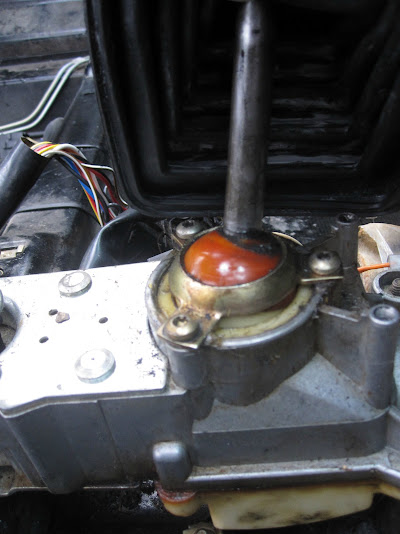
Some good news here. It doesn’t show up well, but I found that the 3 screws visible here holding the shifter in are loose adding to the slop in the change. I still have no 2nd gear syncro, but this will help. I have a new (old) shifter assembly in the parts so I plan on seeing which is better and setting up from scratch.

Image This is the heat blanket over the center tunnel, I think this is just surface rust, but I’ve heard of cars rusting under here so I think it needs to come out, inspected and be cleaned up and painted.
Project Loki - 88 900C - future TSD, Rallycross and track day toy

Adrian Thompson
Posts: 170
Joined: Mon Mar 12, 2012 10:14 am
Number of Saabs currently owned: 1

Re: Project Loki - 1988 classic SAAB turbo

Postby Adrian Thompson » Mon Mar 04, 2013 11:54 am

So, now what to do next, thoughts and plans coming up. I’m thinking out loud here and soliciting input. My plan was to do some mods while working on the car, but the fact is I have no 2nd gear syncro, and I think that a new gearbox or gearbox rebuild has to be planned for next winter (an LSD is a pipe dream, but I can hope). So that being said it’s a case of what do I need to do to get up and running, with that in mind I was planning on staying stock and entering SF (Stock Front wheel driver) in Rallycross. Yes I’ve made a stiffer engine mount to replace the busted one and yes I’m planning on swapping the rat trap seat belts for regular 3 pointers, those mods aren’t going to give a rank beginner any advantage and from what I can tell SCCA rallycrossers are approx.. 10,000,000% less anal that autocrossers so I didn’t think that will matter. But, there has to be a but ;) , I’ve had another idea. I’ll get to that in a mo.
First off the headliner and sun roof.
Image
Image
As you can see the headliner is fubbard, I had planned to pull it, strip it, recover and reinstall. But I don’t have the cover for the sun roof part, so I was thinking, just scrub it to get rid of the remnants of material and foam, then spray bomb the whole thing with fabric paint to make it look not toooooo bad. But then we have the issue of the sun roof. It’s leaking somewhere, I don’t know if it’s blocked trains, the seal, poor fitment or a combination. I do know that the sunroof opens electrically, but won’t close without a struggle. When bought the car and opened it took three people to close. One pressing the button, one manually winding the motor at the back (it’s mounted vertically inside the rear vertical panel behind the bumper, run by long cables!!!) and one pushing the roof from above. I know the motor works, I assume that the gears are stripped at the motor end (it kind of sounds like that) or the rook end. Question, can you swap the gears or do you have to replace the whole cables. Also is there a how to and supplier for parts I’m definitely not prepared to go for the sheet metal riveted over the opening method of repair no matter what class I end up in, this car will see street miles so no striped interior and I like sunroof’s.

If I can fix the roof without pulling the headliner, then I’ll go for the clean and paint method. If not and I have to pull it I guess I’ll recover. I guess worst case is I pull it and just stick some kind of fabric to the outer skin?
Project Loki - 88 900C - future TSD, Rallycross and track day toy

Adrian Thompson
Posts: 170
Joined: Mon Mar 12, 2012 10:14 am
Number of Saabs currently owned: 1

Re: Project Loki - 1988 classic SAAB turbo

Postby Adrian Thompson » Mon Mar 04, 2013 12:00 pm

Next, seatbelts, roll bar and practicality. Now I know the answer to this next bit should be don’t do it, but I can’t help thinking about it :evil: I have this lurking in the basement.

Image

Pic in front of a tarp so you can actually see it and not lose it in the clutter behind. What is it? It’s a bolt in six point cage for a 1g DSM with the rear bars missing. I’ve thrown up a couple of ad’s in the past with no bites, so I was thinking of using the main hoop with the existing flanges cut off as the basis for a roll bar for Loki.

Outside it looks like this.
Image
I’d cut off the bars for the front section, door bars and rear stays then get someone else to weld in new rear stays to the rear upper shock mounts.


But how bit is it?
Image
Image
As you can see it’s the perfect width, right around 1” narrower (½” per side) than the sheet metal of the ‘B’ pillar, great. It would need new feet and boxes that came off the inner sill/rocker, but you expect that, and it would be solidly mounted on the sill, not the weaker floor.

Image [img]<img%20src="https://lh6.googleusercontent.com/-J0zJu-6PPkg/UTS5gy0mz3I/AAAAAAAAEWE/llhwaLFJKEw/s534/IMG_5234+1.jpg[/img]
So height, it’s a crappy angle, but from the floor to the top of the bar is approx. 41-41½” while the car from inner sill/rocker to headliner is right around 40½”. Perfect, the old mounts need to be cut off so if I keep the headliner I cut up 1”, If I remove the headliner I keep it full height.

So the basic dimensions look about right, but does it come close to fitting? I was worried as the 1G DSM has a very pronounced tumblehome which is reflected in how much the top of the cage bends in. The only thing to do is try and put it in, I know it won’t quite fit, but I can get an idea of clearance and interference. So, grab my neighbor Dan (356 owner and rally enthusiast so always willing to come over, lend a hand and BS on a Sunday afternoon) and try to get it in.

The result? Better than I could ever have hoped.
Image
I can’t get it to stand up fully, but I knew that already, it’s looking good though.
Image
The tumblehome is actually perfect, it catches on the wide ‘B’ pillar trim of the rat trap belts, but they are going roll bar or not. The top corner is actually much much closer than the angle looks in this pic, it would be just about perfect after all.

Image


So should I shouldn’t I? Any pretext of being able to use the car occasionally for picking up the kids goes out the window as I’d get rid of the rear seats and carpet the area, but it would be a great load bay (:P). I’d also have to use harness and race seat for rally cross. I was hoping to buy a Corbeau race seat from Team Illuminate, but recent unforeseen expenses ($1,000 to spend an extra day in Florida and change flights after our cruise ship was delayed 10 hours from docking in Tampa due to fog) that’s gone out the window. But I do have a brand new Kirkey economy seat in its box in the basement and a friend with a brand new in box 5 point harness that’s sat in the dark for 10 years. I could add a pair of Kirkey seat mounts from Summit for $50 http://www.summitracing.com/parts/kir-99204
Image
This would also push me into PF (Prepared FWD), but does it matter? I’ve never driven on dirt before.

Tempting tempting, thoughts? Advice?
Project Loki - 88 900C - future TSD, Rallycross and track day toy

User avatar
SwedeSport
Posts: 3021
Joined: Mon Jun 15, 2009 9:52 am
Number of Saabs currently owned: 5
Location: Pottstown, PA
Contact:

Re: Project Loki - 1988 classic SAAB turbo

Postby SwedeSport » Mon Mar 04, 2013 12:05 pm

Any progress is good.

There is no "panel" for the sunroof. it just gets headliner fabric stretched over it and fastened at the front.
Swedesport Motors, Apparel and Accessories for SAAB Junkies.
Http://Facebook.com/swedesportmotors
Swedesportmotors@gmail.com


Return to “Projects and Build Threads”

Who is online

Users browsing this forum: No registered users and 5 guests