Jason, was your 95 rack the same as mine? I was told it was from a 99, but it looks older. It took a little modification to clamp the gutters just right. Had to gring down the arms about 1/8 inch or so and now it works great!
I love that cargo net too - I'm going to start looking for one.
RadioFlyer's 1980 900T
-
RadioFlyer

- Posts: 918
- Joined: Wed Oct 05, 2011 11:08 am
- Nickname: RadioFlyer
- Number of Saabs currently owned: 7
- Location: Utah
-
DrewP

- Posts: 2084
- Joined: Wed Dec 26, 2007 8:27 pm
- Nickname: TANK
- Number of Saabs currently owned: 1
- Location: Monrovia, CA
Re: RadioFlyer's 1980 900T
They sell those cargo nets all over. Harbor Freight I think has them, probably places like Fleet Farm, maybe Home Depot, or contractor supply places. Amazon.com.... Might be called a bed net.
One for a compact size pickup would probably work to get it tight enough over the top of things in the basket.
One for a compact size pickup would probably work to get it tight enough over the top of things in the basket.
"You can educate ignorance, but you can't fix stupid."
-
SwedeSport

- Posts: 3021
- Joined: Mon Jun 15, 2009 9:52 am
- Number of Saabs currently owned: 5
- Location: Pottstown, PA
- Contact:
Re: RadioFlyer's 1980 900T
Same as yours, but longer. Goes almost all the way from the front glass to rear glass.
Swedesport Motors, Apparel and Accessories for SAAB Junkies.
Http://Facebook.com/swedesportmotors
Swedesportmotors@gmail.com
Http://Facebook.com/swedesportmotors
Swedesportmotors@gmail.com
-
132417saab
- Posts: 16
- Joined: Wed Jun 12, 2013 10:20 pm
- Nickname: "numbers"
- Number of Saabs currently owned: 4
Re: RadioFlyer's 1980 900T
RadioFlyer wrote:Finally got some time for a few pics...

thats it I need a basket for the spg
-
RadioFlyer
- Posts: 918
- Joined: Wed Oct 05, 2011 11:08 am
- Nickname: RadioFlyer
- Number of Saabs currently owned: 7
- Location: Utah
Re: RadioFlyer's 1980 900T
Looks like my original 2-knob radio is starting to wane. Time to put in something more modern. Here's my question - the back of the 2-knob has 4 wires coming out of it (plus a split off at the balance/face knob that separates to the different speakers). The new Alpine deck that I have sitting in the basement has like 12 wires in the harness. Can a newer deck be wired into such an early car? Any suggestions?

-
DrewP
- Posts: 2084
- Joined: Wed Dec 26, 2007 8:27 pm
- Nickname: TANK
- Number of Saabs currently owned: 1
- Location: Monrovia, CA
Re: RadioFlyer's 1980 900T
The 12 wires in your new deck are probably 4 pairs for the speakers (8 wires), a constant +12v, switched +12v, ground, and electric antenna signal. It should wire in fine. Your original deck may only get constant +12v and doesn't have the antenna trigger is probably why there are less wires.
"You can educate ignorance, but you can't fix stupid."
-
SwedeSport
- Posts: 3021
- Joined: Mon Jun 15, 2009 9:52 am
- Number of Saabs currently owned: 5
- Location: Pottstown, PA
- Contact:
Re: RadioFlyer's 1980 900T
I just installed a Sony head unit in my 89t tbe other day.
8 wires for lf rf rr lr. Power. Ground. Antenna trigger. And amplifier remote.
if you are powering your speakers @ line level... you wire in the speakers directly to the head unit. If you are running RCA outs to an amp, then you wire the speakers to the amp. Just make sure to isolate the speaker wires so they dont cross and blow the internal amp inside the head unit.
You can grab the head unit side of the harness off a broken factory clarion, and wire that to the head unit, thus leaving the car side of the harness unmolested.
Swedesport Motors, Apparel and Accessories for SAAB Junkies.
Http://Facebook.com/swedesportmotors
Swedesportmotors@gmail.com
Http://Facebook.com/swedesportmotors
Swedesportmotors@gmail.com
-
RadioFlyer
- Posts: 918
- Joined: Wed Oct 05, 2011 11:08 am
- Nickname: RadioFlyer
- Number of Saabs currently owned: 7
- Location: Utah
Re: RadioFlyer's 1980 900T
Awesome. Thanks guys! What do you guys use for decks? I chose the Alpine CDA 105 because there was already one in my CE when I bought it and I really liked it - pretty easy to navigate, USB connection, Satellite ready, RCA hookups for amp, great sound, and doesn't look stupid in the car - it's a dark enough color to look classy and match the interior for the most part. Plus since it's a few years old, you can still find them new for pretty cheap!

-
Geoff

- Team Turbo Troll Crew
- Posts: 3891
- Joined: Fri Oct 20, 2006 3:31 pm
- Nickname: Geoff
- Number of Saabs currently owned: 6
- Location: Nude Humpshire
Re: RadioFlyer's 1980 900T
RadioFlyer wrote:What do you guys use for decks?
Whenever I've bought radios for C900s (and there have been a number of them over the years...) I've had to search hard for a radio that wasn't silver, back lit in annoying blue, or so bright that it screwed with my night vision. The last radio I bought (granted, this is going back 8 years now) was a Clarion DXZ845MC which I really liked. It was pricey but had an internal amp which really cleaned up the sound (18w RMS, 54w peak) and I could set the display color to green which matches the C900 dash lighting scheme (that's important to me). It looks like there are some current Clarion radios that allow you to select the background color, might be worth looking into.
The other thing you could do would be to get one of these

Which have USB and AUX inputs, iPod control, and you can get them with bluetooth.
It would look awesome in your car, but they're not cheap...
http://www.crutchfield.com/p_068ZUMAB/Retrosound-Zuma-Black.html?tp=5684
The kind of dirty that doesn't wash off 
-
SwedeSport
- Posts: 3021
- Joined: Mon Jun 15, 2009 9:52 am
- Number of Saabs currently owned: 5
- Location: Pottstown, PA
- Contact:
Re: RadioFlyer's 1980 900T
I have a Sony XRC410 head unit.
I bought this new in 95 when I was putting together the stereo system in my 85t. It has a Set of RCA outs, RCA input. it also has a plug for the uni link, which connects it to accessories like the wired remote controller joystick. It also has the plug to run the 10 disc CD changer mounted in the trunk. I had the RCA outs going to a digital EQ that that split the signal into front/rear/sub outs. The EQ was a 800.00 unit and had a ton of logic, really a nice addition. It was then run through a Sony Crossover mounted in the dash under the EQ in the center console storage. I had a redundant crossover in the trunk, that further filtered the signal. I had it running into an Orion Cobalt 430 that was running the Polk Audio 5 1/4 mids, and satellite tweeters mounted in the doors in a custom enclosure at the forward end of the upholstered panel where the door handle is located. The component set was filtered by its own crossover as well. I had a set of Rockford Fosgate speakers mounted in the stock dash location. The rear channel had a set of Pioneer 4x10s in the stock location, and a pair of Polk Audio 6 1/2 mounted in the rear deck panel. Those were filtered at the speaker as well. I had all 8 speakers running off the 4 channel Orion amp @ 2 ohms. Just that by itself was a pretty powerful system.
I had a Orion Cobalt 460 bridged mono running a pair of JL10w2 subs in a Qlogic ported bandpass box. It made some serious bass. It was cabable of hitting 17 HZ. I typically had to keep the gains dialed back to keep the wheels from vibrating loose.
It was a learning experience to say the least. I spent nearly 5k building the system, and had nearly 1k in wire and installation supplies. But it just plain rocked. I hung out at the local audio shop where my friends from high school were employed. I got caught up in the stereo craze. One friend had a Geo Tracker with a 65k system in it. But he was sponsored by JL audio, and the local audio shop to compete at DB drag races. His car was also a showcase for the audio shop, and would travel around showing off the shops work.
It all ended one day when I turned the power on, and within a few seconds smelled smoke. Ended up cooking the Crossover, which took out the 460, both crossovers, and the whole rear channel. I was able to salvage the head unit, EQ, front speakers, subs, 430 Cobalt, Cd changer, and the subs. Thus the box of stereo components laying around the garage. I have had these components in like 4 different cars, in many different configurations.
The Sony head unit is currently installed in the 89t sedan, I would have to say that I have gotten my money's worth out of this radio.
- Attachments
-
- 433.jpg (7.66 KiB) Viewed 3842 times
Swedesport Motors, Apparel and Accessories for SAAB Junkies.
Http://Facebook.com/swedesportmotors
Swedesportmotors@gmail.com
Http://Facebook.com/swedesportmotors
Swedesportmotors@gmail.com
-
RadioFlyer
- Posts: 918
- Joined: Wed Oct 05, 2011 11:08 am
- Nickname: RadioFlyer
- Number of Saabs currently owned: 7
- Location: Utah
Re: RadioFlyer's 1980 900T
Geez, $65k on his sound system? Can you imagine the Saab you could build for that much money? I really like that older 2-knob look but I don't want to spend $250 on a deck. Maybe I'll get rich and change my mind... we'll see. For now I'll just stick that Alpine in there and see how things sound.
Re: RadioFlyer's 1980 900T
When I was younger, I loved the bright and obnoxious car stereos. Now, I cannot stand them. Lately, I have been snagging up older Blaupunkt cm147 cassette decks off ebay. These stereos are high power for their age, have a remote AUX output, and a remote control (useful in the 914). The older Blaupunkt stereos just have that perfect look for a c900 dash, or any other older European car for that matter. Plus, who the hell would break into a car to rip off a tape deck? http://www.continentalimports.com/in_aspen_cm147.html
I had an Alpine CDA9886 in one of my old beryl SPGs, and I hated the brightness of it until I discovered the black out mode. I also learned that the old cda9811 in the SiS also had the blackout screen. Still I prefer the look of older stereos though.
Seeing your build really makes me want an early flatnose
- Attachments
-
- cm147.jpg (16.49 KiB) Viewed 3793 times
-
s900t8v
- Posts: 30
- Joined: Sun Jul 29, 2012 2:56 am
- Number of Saabs currently owned: 1
- Location: Australia
Re: RadioFlyer's 1980 900T
http://www.ebay.com.au/itm/181064767845 ... 1423.l2649
I love these new pioneer head units - I haven't bought one as I have had to put money aside for a new DI cassette, but I was playing with one in store... you can customise the LED backlighting (for the entire device) theres a couple of thousands of colour combos etc you can make up, from I think 20 or so base colours but then you can adjust the brightness etc
not to mention these are dirt cheap for he features they have, 4v pre amp outs x 6 and heaps of other stuff! great for building onto with amps etc...
84 Trionic 5.5 8v Turbo
-
RadioFlyer
- Posts: 918
- Joined: Wed Oct 05, 2011 11:08 am
- Nickname: RadioFlyer
- Number of Saabs currently owned: 7
- Location: Utah
Re: RadioFlyer's 1980 900T
PADDED DASH REPAIR TAKE 2:
So I tried repairing the grand-canyon style cracked dash back on page 2. Didn't quite work out how I had hoped. So I tried again three or four times with different techniques and products. First, filled with Gorilla glue and covered with bed liner. Cracked within about 2 days. Next, filled with Padded Dash filler from Urathane Supply Company and covered with a different kind of bedliner. Cracked within one week. Next filled again with a different hardness of padded dash filler and covered with Plasti-Dip. It cracked again, but the Plasti-Dip stretches instead of cracking like the bed liner. Problem is the stretching causes it to wrinkle down the crack, so it looks even worse. So I ripped off the plasti-dip and filled again. And again. And again - no top, just filled and left in the sun to see what I needed to do to make it not crack. Here were the results:
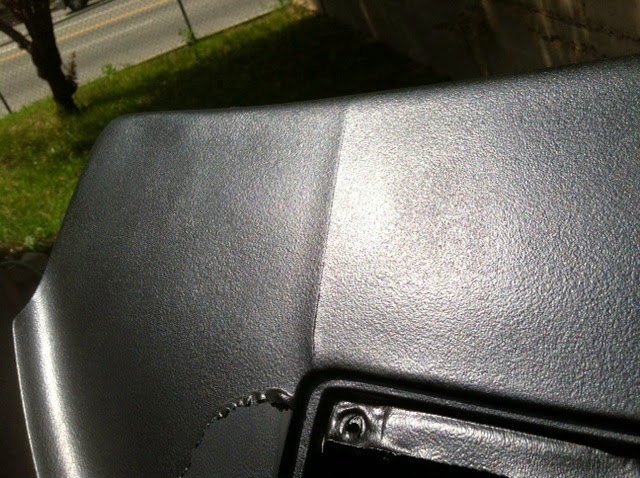
1. The cracking does not seem to result from just heat - it's the movement from very hot to cool that really opens it up. Once I placed the dash on a stand to make sure the crack was opened as wide as possible before filling so it would fill open instead of closed. I left it in the sun in 102 degrees for the whole day. Crack did not open. I moved it to the shade and within an hour the crack was almost a quarter inch wide!
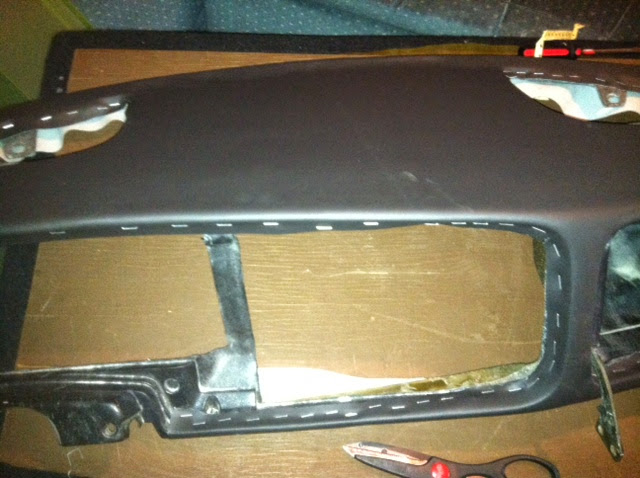
2. If the topping material (bedliner? plasti-dip?) is soft or crackable, it doesn't help - it is just at the whim of the filler which is not meant to prevent cracks, just fill them. That's why the original Vinyl lasts so much longer - it is flexible enough to not be brittle, but strong enough to hold a forming crack together. So you need something pretty solid - bedliner is too brittle and plasti-dip is too flexible. Both are too thin. I also came across a really cheap dash cap that I thought I would try. Ran into 3 big problems with that- first, it didn't fit quote right around the speaker grills - if I were able to get the grille in, I never would have gotten it back out. Second, it was flat across the cubby, so no more cubby. Third, it warped badly in the sun after about a month of Utah summer.
3. The only repair that I have seen last more than a week was stretched vinyl cloth. I found the car 3 years later after it had been abused and sat in the sun for years and the dash still looked like the day I installed it.
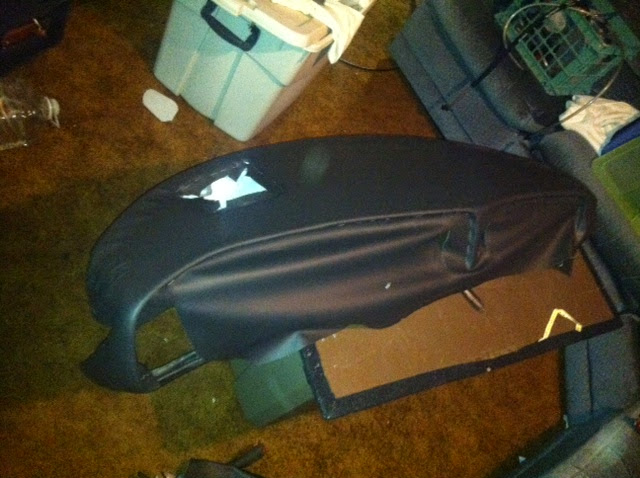
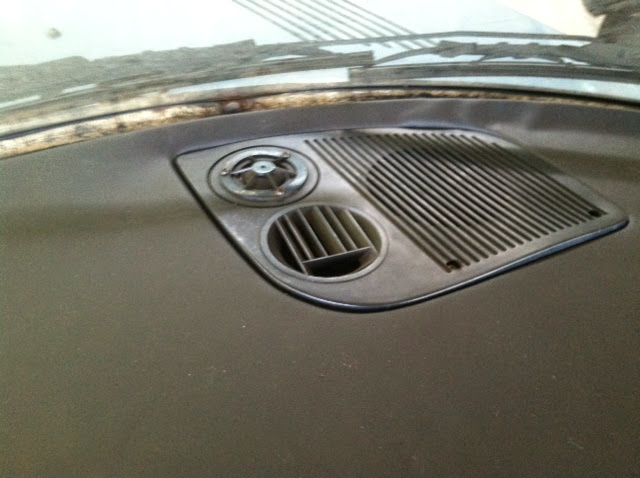
SO.... I decided to scrap the whole idea of filling and repairing and just bought some stretchable vinyl from Hancock fabric (found a section in the scraps and bought it for $9!). Then grabbed some 3M 90 spray adhesive and my upholstery stapler and went to town. I filled the indentation on the upper part with bondo, smoothed it as much as possible, and stretched the vinyl. The spray adhesive will not hold up to heat, but you really only need it for long enough to put in the staples. Make sure you leave a lot of extra vinyl to stretch it over the back far enough to staple to the foam. In the front, I had to wrap it around a couple of times to get the corners just right and did not stretch it to the spot behind the steering wheel. It's a tight squeeze to get the right side vent and the speakers to fit, but I think it's the best fix I can find and I think it looks really nice.
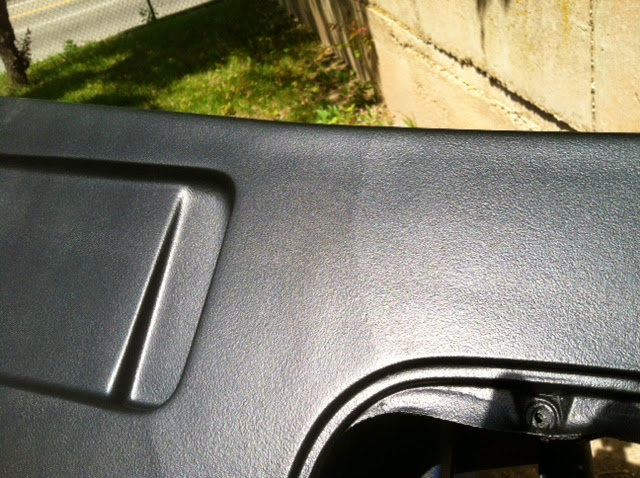
Here are some pics of the repairs:
This was after plasti-dip. The third pic shows where the crack opened up again after about an hour:
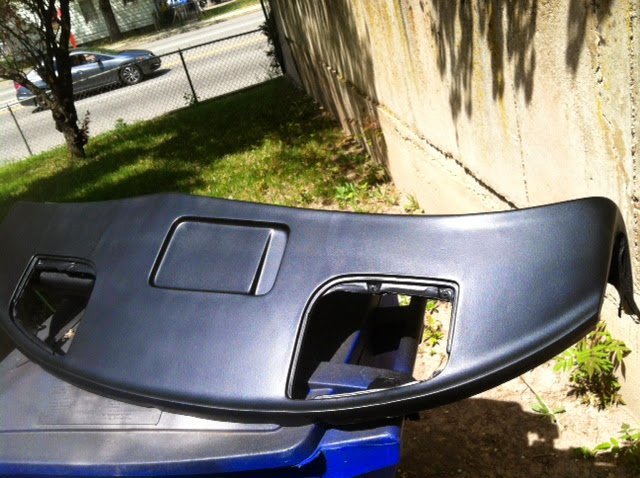
This was the resulting obsession:
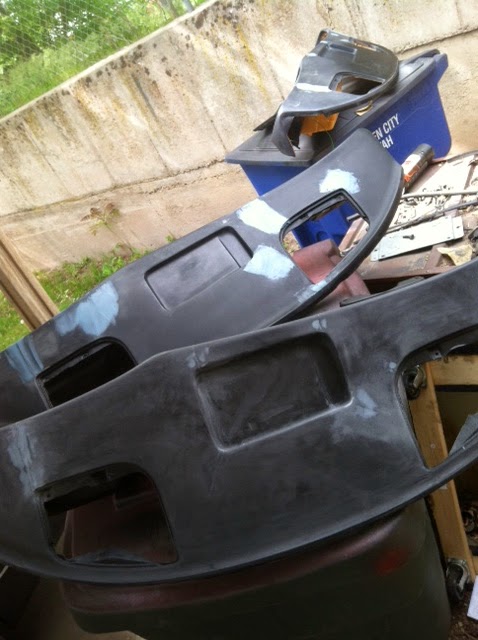
And the vinyl:
So I tried repairing the grand-canyon style cracked dash back on page 2. Didn't quite work out how I had hoped. So I tried again three or four times with different techniques and products. First, filled with Gorilla glue and covered with bed liner. Cracked within about 2 days. Next, filled with Padded Dash filler from Urathane Supply Company and covered with a different kind of bedliner. Cracked within one week. Next filled again with a different hardness of padded dash filler and covered with Plasti-Dip. It cracked again, but the Plasti-Dip stretches instead of cracking like the bed liner. Problem is the stretching causes it to wrinkle down the crack, so it looks even worse. So I ripped off the plasti-dip and filled again. And again. And again - no top, just filled and left in the sun to see what I needed to do to make it not crack. Here were the results:
1. The cracking does not seem to result from just heat - it's the movement from very hot to cool that really opens it up. Once I placed the dash on a stand to make sure the crack was opened as wide as possible before filling so it would fill open instead of closed. I left it in the sun in 102 degrees for the whole day. Crack did not open. I moved it to the shade and within an hour the crack was almost a quarter inch wide!
2. If the topping material (bedliner? plasti-dip?) is soft or crackable, it doesn't help - it is just at the whim of the filler which is not meant to prevent cracks, just fill them. That's why the original Vinyl lasts so much longer - it is flexible enough to not be brittle, but strong enough to hold a forming crack together. So you need something pretty solid - bedliner is too brittle and plasti-dip is too flexible. Both are too thin. I also came across a really cheap dash cap that I thought I would try. Ran into 3 big problems with that- first, it didn't fit quote right around the speaker grills - if I were able to get the grille in, I never would have gotten it back out. Second, it was flat across the cubby, so no more cubby. Third, it warped badly in the sun after about a month of Utah summer.
3. The only repair that I have seen last more than a week was stretched vinyl cloth. I found the car 3 years later after it had been abused and sat in the sun for years and the dash still looked like the day I installed it.
SO.... I decided to scrap the whole idea of filling and repairing and just bought some stretchable vinyl from Hancock fabric (found a section in the scraps and bought it for $9!). Then grabbed some 3M 90 spray adhesive and my upholstery stapler and went to town. I filled the indentation on the upper part with bondo, smoothed it as much as possible, and stretched the vinyl. The spray adhesive will not hold up to heat, but you really only need it for long enough to put in the staples. Make sure you leave a lot of extra vinyl to stretch it over the back far enough to staple to the foam. In the front, I had to wrap it around a couple of times to get the corners just right and did not stretch it to the spot behind the steering wheel. It's a tight squeeze to get the right side vent and the speakers to fit, but I think it's the best fix I can find and I think it looks really nice.
Here are some pics of the repairs:
This was after plasti-dip. The third pic shows where the crack opened up again after about an hour:
This was the resulting obsession:
And the vinyl:
Last edited by RadioFlyer on Fri Jul 26, 2013 10:41 am, edited 1 time in total.
-
RadioFlyer
- Posts: 918
- Joined: Wed Oct 05, 2011 11:08 am
- Nickname: RadioFlyer
- Number of Saabs currently owned: 7
- Location: Utah
Re: RadioFlyer's 1980 900T
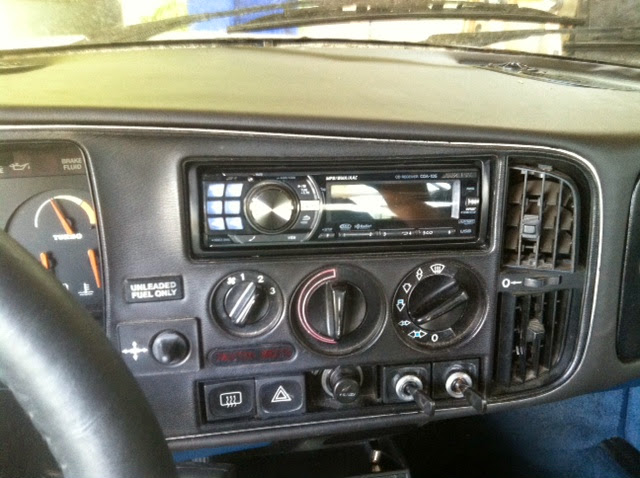
STEREO INSTALLATION:
So like I said before, it was time for an upgrade. The original 2-knob was no longer cutting it - the cassette stopped working, lost a couple of speakers, and the radio just kept getting fuzzier. Decided on the Alpine CDA-105 and started the installation. It ended up being more involved than I expected - I was going to keep the original speaker wiring because it looked like it had been replaced sometime within the last 20 years or so and that was good enough for me. Turns out I was wrong:

Replaced with really nice wiring by just taping it to the old wiring and pulling it all through the dash.
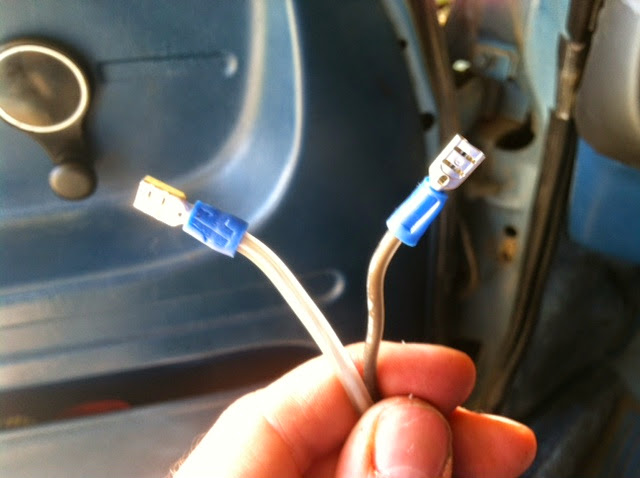
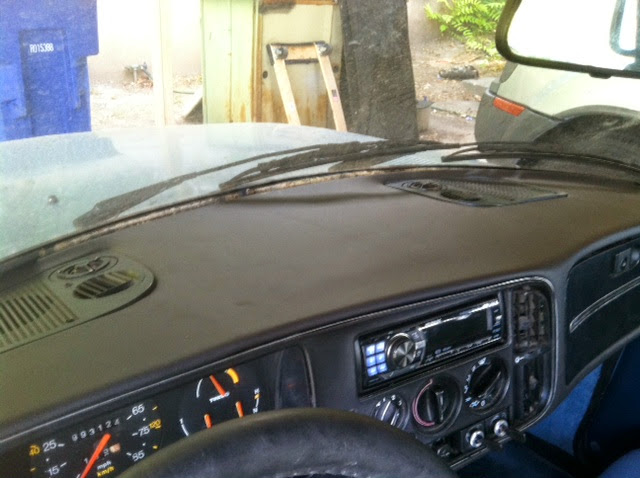
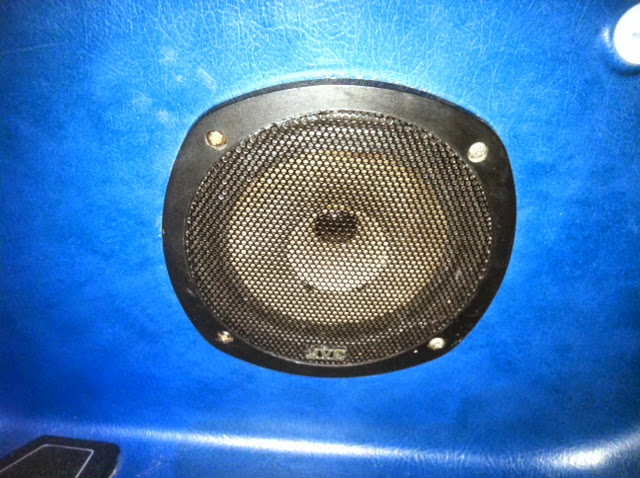
Next took out the old 2-knob. The wires for all of the speakers were running to a separate knob that controlled balance and fade. So that was where the additional 8 wires were. Only 4 went into the back of the deck - switched power (blue), ground (black), battery (red), and illumination (white) I believe. These were not the original wires from the car - they must have been installed with the 2-knob a year or two after the car was purchased. I clipped most of them and ran a new battery wire through the firewall, connected switched power and illumination to the cig lighter, grounded to the existing ground, and connected all of the speaker wires. Then purchased a 3' USB extension to connect to the back of the Alpine and ran it to right under the kick panel. It WORKED GREAT! Next, I stuck in a set of JVC speakers that I found in the Pick N Pull in the back to replace the busted rear speakers, and grabbed the factory performance dash speakers with tweeters (also from pick n pull) - the main speakers were blown and the tweeters didn't seem to be working, so I stuck in a set of Alpines that I had kicking around and just clipped the tweeter wires. May stick in a replacement set of tweeters at some point. The little 6- arm covers are wicked fragile though - I had two sets and broke arms from all but one of them. Stupid me. Anyway, I love the look and the sound is a gigantic improvement. I may end up replacing it eventually with one of those replica 2-knobs from Crutchfield at some point, but for the trip cross country, this will do just fine! Here it is installed with the newly recovered dash. And the sound is awesome!

So like I said before, it was time for an upgrade. The original 2-knob was no longer cutting it - the cassette stopped working, lost a couple of speakers, and the radio just kept getting fuzzier. Decided on the Alpine CDA-105 and started the installation. It ended up being more involved than I expected - I was going to keep the original speaker wiring because it looked like it had been replaced sometime within the last 20 years or so and that was good enough for me. Turns out I was wrong:
Replaced with really nice wiring by just taping it to the old wiring and pulling it all through the dash.
Next took out the old 2-knob. The wires for all of the speakers were running to a separate knob that controlled balance and fade. So that was where the additional 8 wires were. Only 4 went into the back of the deck - switched power (blue), ground (black), battery (red), and illumination (white) I believe. These were not the original wires from the car - they must have been installed with the 2-knob a year or two after the car was purchased. I clipped most of them and ran a new battery wire through the firewall, connected switched power and illumination to the cig lighter, grounded to the existing ground, and connected all of the speaker wires. Then purchased a 3' USB extension to connect to the back of the Alpine and ran it to right under the kick panel. It WORKED GREAT! Next, I stuck in a set of JVC speakers that I found in the Pick N Pull in the back to replace the busted rear speakers, and grabbed the factory performance dash speakers with tweeters (also from pick n pull) - the main speakers were blown and the tweeters didn't seem to be working, so I stuck in a set of Alpines that I had kicking around and just clipped the tweeter wires. May stick in a replacement set of tweeters at some point. The little 6- arm covers are wicked fragile though - I had two sets and broke arms from all but one of them. Stupid me. Anyway, I love the look and the sound is a gigantic improvement. I may end up replacing it eventually with one of those replica 2-knobs from Crutchfield at some point, but for the trip cross country, this will do just fine! Here it is installed with the newly recovered dash. And the sound is awesome!
Last edited by RadioFlyer on Fri Jul 26, 2013 10:41 am, edited 2 times in total.
Return to “Projects and Build Threads”
Who is online
Users browsing this forum: No registered users and 7 guests