Gripper Limited Slip Technical Thread
-
Geoff

- Team Turbo Troll Crew
- Posts: 3892
- Joined: Fri Oct 20, 2006 3:31 pm
- Nickname: Geoff
- Number of Saabs currently owned: 6
- Location: Nude Humpshire
Gripper Limited Slip Technical Thread
This thread is for anything technical that has to do with the Gripper Limited Slip differentials we now have.
The kind of dirty that doesn't wash off 
-
Geoff
- Team Turbo Troll Crew
- Posts: 3892
- Joined: Fri Oct 20, 2006 3:31 pm
- Nickname: Geoff
- Number of Saabs currently owned: 6
- Location: Nude Humpshire
Diff disassembly/assembly
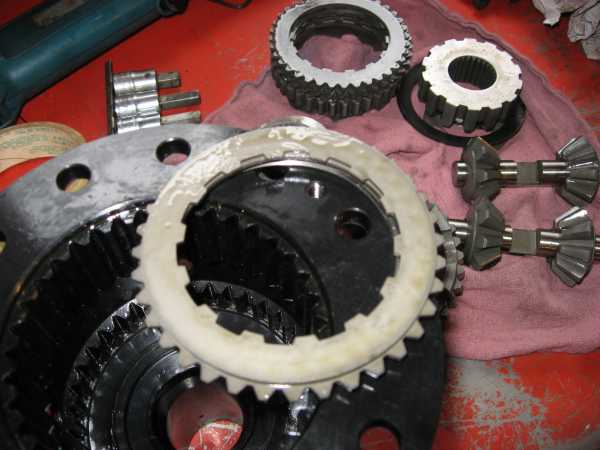
I'm mostly putting this together so people can see what is in their diffs.
The two halves of the diff separate at the ring gear flange. They are held together by three 6mm bolts with 4mm allen key heads.
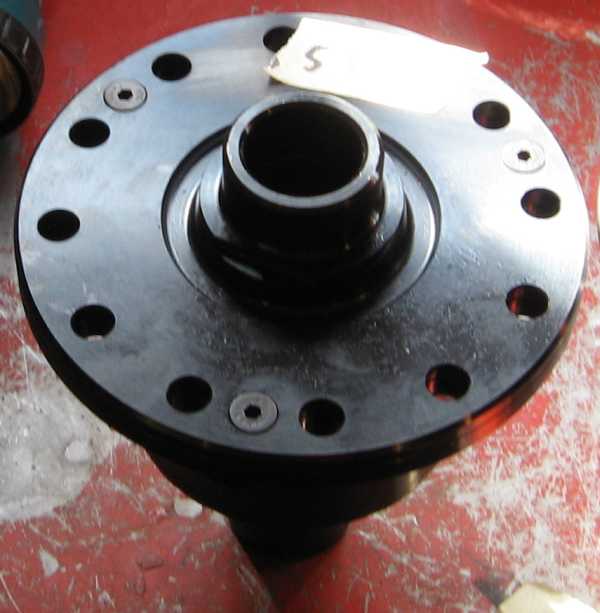
Some of the diffs had tight bolts, some were lose. The internals are somewhat under pressure when you remove the bolts so they will pop apart. It makes sense to try to loosen the bolts using an impact driver because they are pretty easy to damage if they're in real tight and you don't have the allen tool centered. The bolts are really hard so we had to find a good bit when we had to drill one of the heads off (the hole rounded out even though we were using an impact driver). Once it was drilled deep enough though the head just popped off and the threaded portion was easy enough to spin out of the diff.
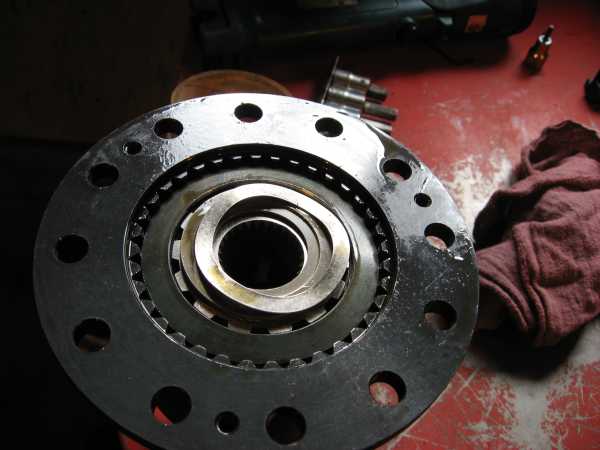
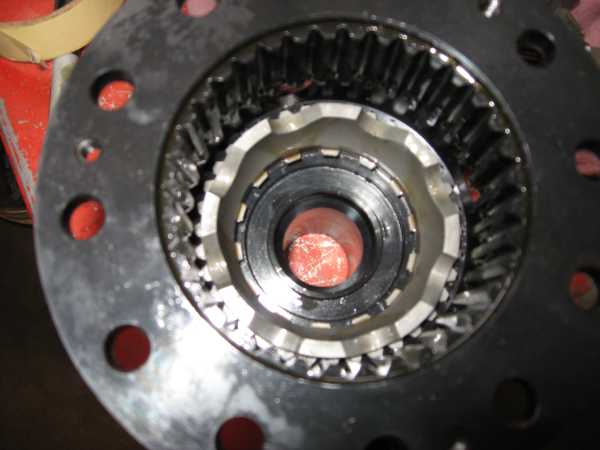
In the next picture you can see where the two halves separate. You can also see some flats just inside of the bearing surfaces. This will make pulling bearings off easy. The stock ones (and the Quaife) don't have these flats so you need a SAAB Special Tool to pull the bearings if they're tight. Score for us.

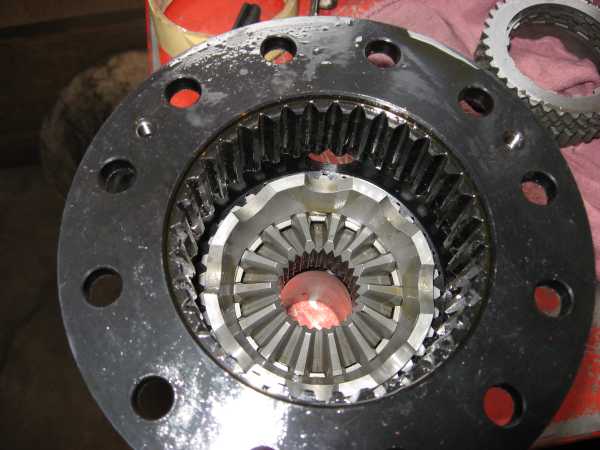
Once the small half is removed you can see the wave spring, a large washer under it, one of the splined axle gears, and the Belleville washer (ring at the top of the clutch pack)
The splined gear and the large washer, removed
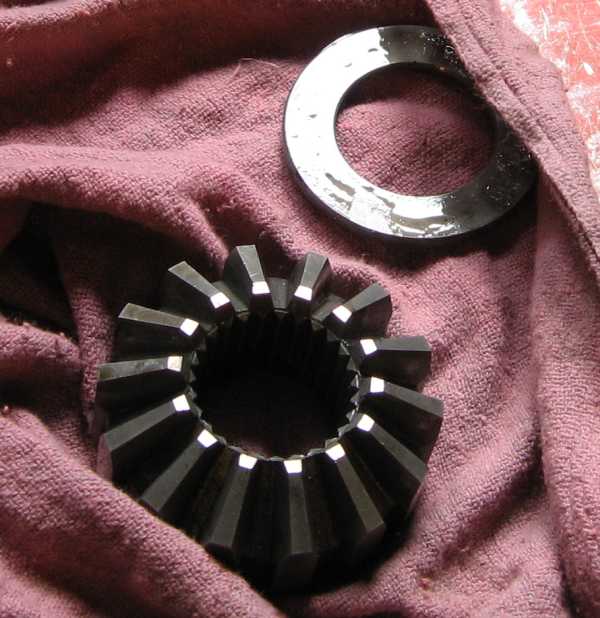
The right side clutch pack (4 pairs of clutches and one extra plate, probably to take up space and add correct pre-load) and planet drivers removed
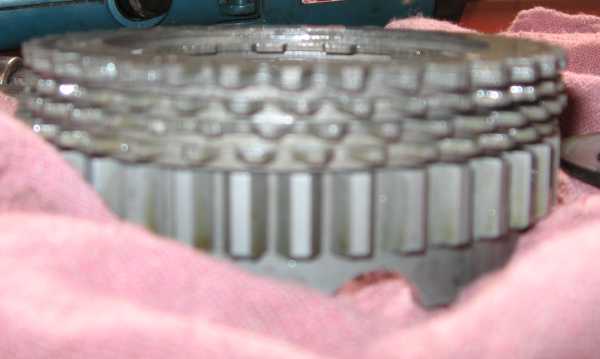
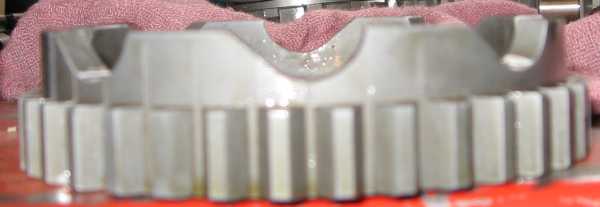
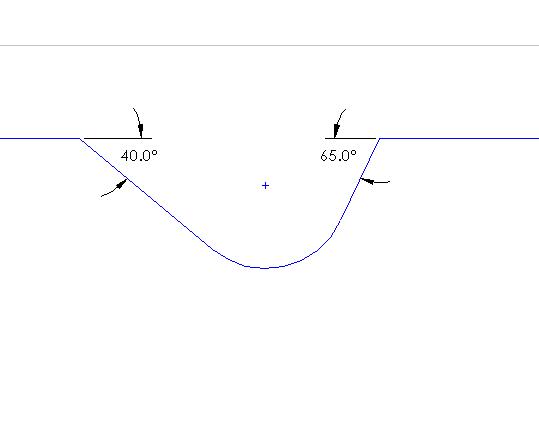
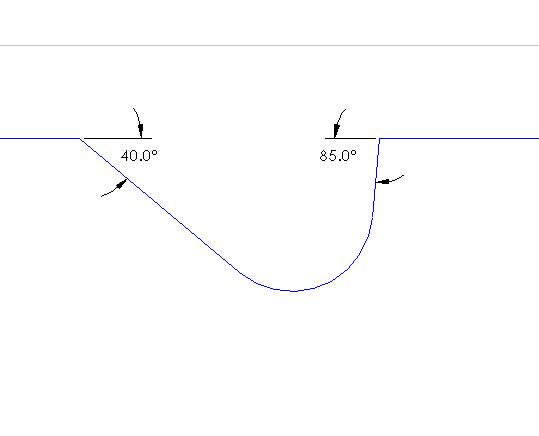
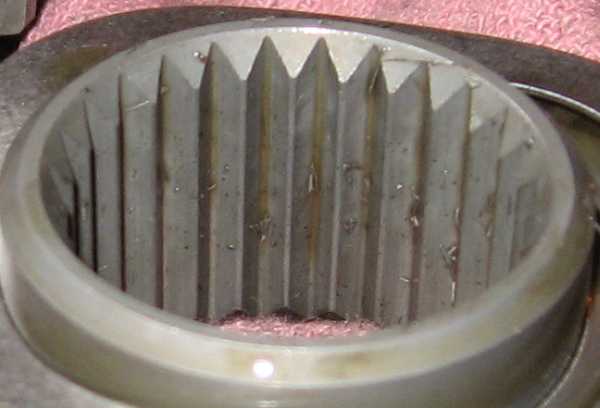
This is what the ramp angles on the planet drivers look like. They’re a bit hard to discern which angle is which at first but the 85° angle has a pretty sharp edge. I noticed when putting the diff back together that one of the sets of angles on the planet driver was labeled, 40° on one side and 85° on the other.
Planetary gears

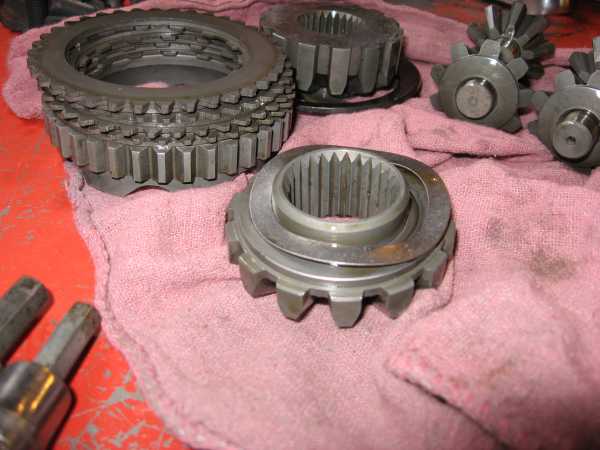
Planetary gears removed, clutch pack, splined gear, etc.
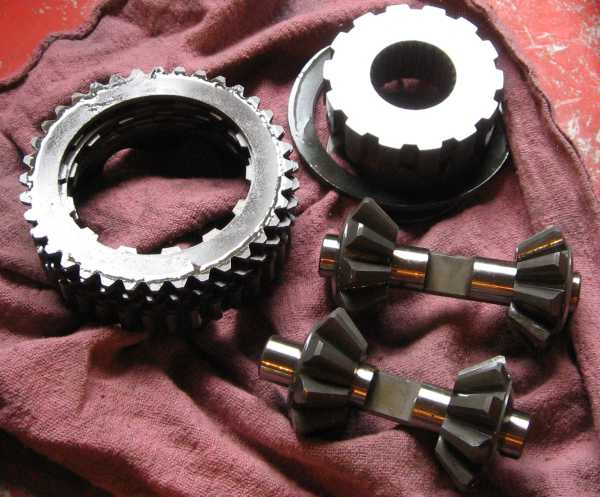
Left side planet driver (dual angle) and left side splined gear
Left side splined gear and wave spring (front), right side clutch pack and planet driver, planetary gears, right side splined gear
Things didn’t look so clean. I think it makes sense to disassemble these, clean them, and re-assemble…
Left side planet driver
Left side clutch pack (only one pair on this side)
Assembly is reverse of removal

The two halves of the diff separate at the ring gear flange. They are held together by three 6mm bolts with 4mm allen key heads.
Some of the diffs had tight bolts, some were lose. The internals are somewhat under pressure when you remove the bolts so they will pop apart. It makes sense to try to loosen the bolts using an impact driver because they are pretty easy to damage if they're in real tight and you don't have the allen tool centered. The bolts are really hard so we had to find a good bit when we had to drill one of the heads off (the hole rounded out even though we were using an impact driver). Once it was drilled deep enough though the head just popped off and the threaded portion was easy enough to spin out of the diff.
In the next picture you can see where the two halves separate. You can also see some flats just inside of the bearing surfaces. This will make pulling bearings off easy. The stock ones (and the Quaife) don't have these flats so you need a SAAB Special Tool to pull the bearings if they're tight. Score for us.
Once the small half is removed you can see the wave spring, a large washer under it, one of the splined axle gears, and the Belleville washer (ring at the top of the clutch pack)
The splined gear and the large washer, removed
The right side clutch pack (4 pairs of clutches and one extra plate, probably to take up space and add correct pre-load) and planet drivers removed
This is what the ramp angles on the planet drivers look like. They’re a bit hard to discern which angle is which at first but the 85° angle has a pretty sharp edge. I noticed when putting the diff back together that one of the sets of angles on the planet driver was labeled, 40° on one side and 85° on the other.
Planetary gears
Planetary gears removed, clutch pack, splined gear, etc.
Left side planet driver (dual angle) and left side splined gear
Left side splined gear and wave spring (front), right side clutch pack and planet driver, planetary gears, right side splined gear
Things didn’t look so clean. I think it makes sense to disassemble these, clean them, and re-assemble…
Left side planet driver
Left side clutch pack (only one pair on this side)
Assembly is reverse of removal
Last edited by Geoff on Thu Oct 18, 2007 2:24 pm, edited 1 time in total.
The kind of dirty that doesn't wash off
-
Jordan

- Site Admin
- Posts: 4068
- Joined: Fri Oct 13, 2006 2:38 pm
- Number of Saabs currently owned: 6
- Location: Vernon, CT
- Contact:
Sweet thread Geoff. Having never taken apart a trans (or a dif), I only have an inkling of an idea about how the basic mechanics work. I'm sure it's relatively easy once you've had some experience, but it's safe to say I'll be a little nervous when installing it. When is everyones plan to install theirs? It would be really neat to have an LSD (er...dif) party and go through the process and share whichever special tools are needed. I have a few trans that I could probably cobble together to make one nice..or I could try to refresh a JY one. I just don't have any experience. Where is Matt Joseph when you need him 
-
DeLorean
- Posts: 1193
- Joined: Sat Mar 31, 2007 9:54 pm
- Number of Saabs currently owned: 9
- Location: Pennsylvania, Forever!
- Contact:
Jordan, I was thinking the same thing. I have a pretty big place here, and we could just set up in the living room if need be :lol: Where ever it's going down though I think a trans / diff tech session is in order. I am pretty good for doing the basic rebuilds (assuming something serious is not broken) but I do not know exactly how to set up a diff, as I have never rebuilt a box with a bad pinion bearing, or swapped a ring & pinion (never had the need yet!). I also don't know what material in the case needs to be removed to fit this in. Also, it's going to be interesting pressing on bearings and fitting the speedo gear with the diff in the housing already, not sure really how to do that.
Less brake more gas!
-
Geoff
- Team Turbo Troll Crew
- Posts: 3892
- Joined: Fri Oct 20, 2006 3:31 pm
- Nickname: Geoff
- Number of Saabs currently owned: 6
- Location: Nude Humpshire
There wasn't any paperwork that came with the diffs. I know which diffs are dual angle and which are single but I don't know what angle the dual angle diffs are set at (another reason to pull your own apart when you get it). I was thinking we could mount one in a tranny without the ring gear and measure the pre-load somehow with a torque wrench. It is something we should ask Tom about. Lets get a list of questions together to ask him about and then someone can do the honors and call him and ask them all
I'm going to try to pop mine into a tranny tonight. Its just a spare tranny and I'm only going to check fit and assembly process, not set the tranny backlash/shim the drivers, or any of that other stuff. I'll take pictures and post them in this thread.
When is everyones plan to install theirs?
I'm going to try to pop mine into a tranny tonight. Its just a spare tranny and I'm only going to check fit and assembly process, not set the tranny backlash/shim the drivers, or any of that other stuff. I'll take pictures and post them in this thread.
Last edited by Geoff on Mon Oct 15, 2007 11:09 am, edited 1 time in total.
The kind of dirty that doesn't wash off
-
Geoff
- Team Turbo Troll Crew
- Posts: 3892
- Joined: Fri Oct 20, 2006 3:31 pm
- Nickname: Geoff
- Number of Saabs currently owned: 6
- Location: Nude Humpshire
The comment DeLorean made about the speedo gear reminded me... The hole for the speedo gear is just a straight hole. On the stock diffs there is a chamfer that helps you guide the spring pin into the hole (which is hard to do because you can't see).
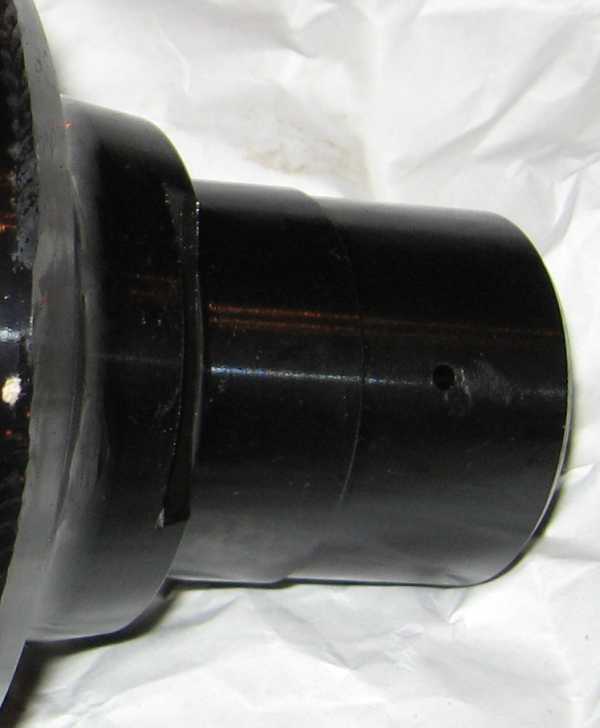
It would make putting the speedo gear on much easier if you take a drill bit - probably twice the diameter of the spring pin hole - and just buzzed the edge of the hole a little bit to put a chamfer on it. You'll be able to locate the spring pin a lot easier.
It would make putting the speedo gear on much easier if you take a drill bit - probably twice the diameter of the spring pin hole - and just buzzed the edge of the hole a little bit to put a chamfer on it. You'll be able to locate the spring pin a lot easier.
The kind of dirty that doesn't wash off
-
Geoff
- Team Turbo Troll Crew
- Posts: 3892
- Joined: Fri Oct 20, 2006 3:31 pm
- Nickname: Geoff
- Number of Saabs currently owned: 6
- Location: Nude Humpshire
So I tried installing my diff last night. Getting it in wasn't too bad, I had to remove the 'top plate' of the diff, leave most of the internals in it, loosely mount the ring gear and it dropped in. I'll write up an installation procedure with tips and tricks later but the bigger concern I have is an interference.
I couldn't get my old bearings off any of the stock diffs and I don't have any new ones on hand so I put it in without the bearings in place (but with the speedo on). I'm pretty sure it will drop in with the bearings on. I tried putting the inner drivers on, which would hold the diff in the right place and I couldn't quite get things lined up. The bolts that hold the ring gear on were interfering with the gear selector shaft.
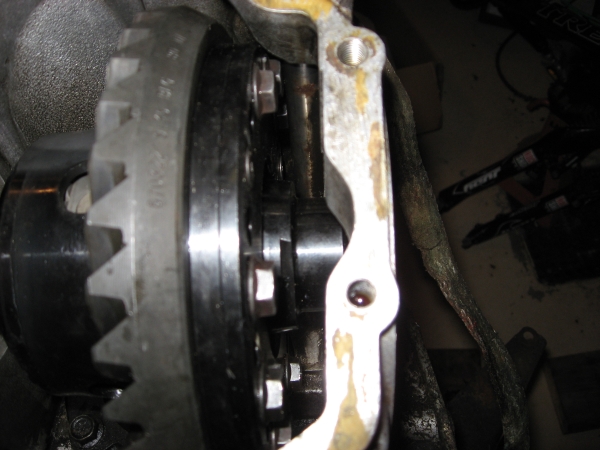
The bolts are closer to it because the flange that the ring gear mounts to is thicker by around 0.100" (I need to measure a few to make sure that measurement is right). This puts the bolts around 0.100" closer to the gear selector shaft. I am going to re-install the stock diff tonight and try to get some feeler gauges down in there to see how much clearance there is with a stock setup (which I think will vary a little bit when you adjust the backlash). That will let me know how much distance we need to regain.
The distance that is too thick is between the red arrows

There are a few ways to make it fit.
1) Taking material off the gear selector shaft - either by grinding a bunch away while it is in the tranny or by taking some material off with a lathe when the shaft is out of the box during a rebuild.
2) Remove material from a few different surfaces. I figure we can remove some material from the top plate on the surface that the bolt heads touch. The distance between the blue arrows is around 0.220" We can probably take 0.050" off of the outside (this won't affect any of the internals). And maybe we can take 0.050" off of the bolt heads so they aren't as tall. We might not need to regain all 0.100" so the amount we'd remove from these surfaces could change.
3) Different bolts: I've done some looking but I haven't found any normal hex head bolts that have heads that are any shorter than the ones we have. There could be some out there. The bolts are 10mm x 1.25 pitch (at least that is what Tom sent with the diffs). The stock bolts and the ones Tom sent both have heads that are about 6.4mm (0.255") tall. So if we can find some that have heads that are around 5 to 5.5mm tall (0.200" to 0.220") we'd regain some distance. The heads can't be too short becuase they'd weaken the bolts. Another thing to do would be to countersink the holes in the top plate and use countersunk allen bolts, but I worry about getting those off once they've been theadlocked in place (the allen hex is only a 6mm). The ring gear neeeds to be loosened from the diff in order to get the diff out of the box. This would regain us more distance than we need (we'd gain 0.250")


These could reduce bolt head height by around 0.040" but again I'm not sure about using the allen head bolts, thread locked, tightened to 66ft-lb and then having to remove them.

4) Take material off of the inside of the ring gear flange on the main case (material at the face of the arrow on the right side). This would reduce the width between the green arrows. However this would change the fit on the internal components. It would add more pre-load to the clutches and the force on the splined gear that the driveshaft goes into. The inside of the top plate might be able to be modified to make the adjustment but there may not be enough material to do that. This modification would also change the dimension in pink so we'd have to put a shim under the diff bearing on that side OR have a new top plate built to the proper specs. I assume Tom didn't do any of this because there is a reason. I'm going to have to call him to find out some of this and talk engineering with him
I couldn't get my old bearings off any of the stock diffs and I don't have any new ones on hand so I put it in without the bearings in place (but with the speedo on). I'm pretty sure it will drop in with the bearings on. I tried putting the inner drivers on, which would hold the diff in the right place and I couldn't quite get things lined up. The bolts that hold the ring gear on were interfering with the gear selector shaft.
The bolts are closer to it because the flange that the ring gear mounts to is thicker by around 0.100" (I need to measure a few to make sure that measurement is right). This puts the bolts around 0.100" closer to the gear selector shaft. I am going to re-install the stock diff tonight and try to get some feeler gauges down in there to see how much clearance there is with a stock setup (which I think will vary a little bit when you adjust the backlash). That will let me know how much distance we need to regain.
The distance that is too thick is between the red arrows
There are a few ways to make it fit.
1) Taking material off the gear selector shaft - either by grinding a bunch away while it is in the tranny or by taking some material off with a lathe when the shaft is out of the box during a rebuild.
2) Remove material from a few different surfaces. I figure we can remove some material from the top plate on the surface that the bolt heads touch. The distance between the blue arrows is around 0.220" We can probably take 0.050" off of the outside (this won't affect any of the internals). And maybe we can take 0.050" off of the bolt heads so they aren't as tall. We might not need to regain all 0.100" so the amount we'd remove from these surfaces could change.
3) Different bolts: I've done some looking but I haven't found any normal hex head bolts that have heads that are any shorter than the ones we have. There could be some out there. The bolts are 10mm x 1.25 pitch (at least that is what Tom sent with the diffs). The stock bolts and the ones Tom sent both have heads that are about 6.4mm (0.255") tall. So if we can find some that have heads that are around 5 to 5.5mm tall (0.200" to 0.220") we'd regain some distance. The heads can't be too short becuase they'd weaken the bolts. Another thing to do would be to countersink the holes in the top plate and use countersunk allen bolts, but I worry about getting those off once they've been theadlocked in place (the allen hex is only a 6mm). The ring gear neeeds to be loosened from the diff in order to get the diff out of the box. This would regain us more distance than we need (we'd gain 0.250")
These could reduce bolt head height by around 0.040" but again I'm not sure about using the allen head bolts, thread locked, tightened to 66ft-lb and then having to remove them.
4) Take material off of the inside of the ring gear flange on the main case (material at the face of the arrow on the right side). This would reduce the width between the green arrows. However this would change the fit on the internal components. It would add more pre-load to the clutches and the force on the splined gear that the driveshaft goes into. The inside of the top plate might be able to be modified to make the adjustment but there may not be enough material to do that. This modification would also change the dimension in pink so we'd have to put a shim under the diff bearing on that side OR have a new top plate built to the proper specs. I assume Tom didn't do any of this because there is a reason. I'm going to have to call him to find out some of this and talk engineering with him
The kind of dirty that doesn't wash off
-
Geoff
- Team Turbo Troll Crew
- Posts: 3892
- Joined: Fri Oct 20, 2006 3:31 pm
- Nickname: Geoff
- Number of Saabs currently owned: 6
- Location: Nude Humpshire
Well Jennifer was just here to pick up her diff. I told her about the fit I experienced and she reminded me that Sonett had put his in and was able to fit it. So I'll see what the distance looks like with the stock diff in place and go from there. It will probably just be really tight... Of course adjusting the backlash moves the diff from side to side a little bit too....
The kind of dirty that doesn't wash off
-
Crazyswede

- Team Turbo Troll Crew
- Posts: 4540
- Joined: Fri Sep 22, 2006 3:53 pm
- Nickname: Mongo
- Number of Saabs currently owned: 97
- Location: Vermont
- Contact:
-
allessence
- Posts: 469
- Joined: Thu Jan 18, 2007 10:09 pm
- Nickname: allessence
- Number of Saabs currently owned: 6
- Location: Rutland, MA
Thanks Geoff,
Was a pleasure finially to put the name and face together. Sorry the welding demo/trial was so short lived. Also PM me your address I forgot to give you the money for the customs duty. I was floating, and I my brain must have gotten lemon aided. Made it home and then crashed after 800mg vitamin I.
Anyhow, this evening I was able to get the diff apart and clean everything up. Used royal purple 75w-90 max gear for an assembly lube.
I noticed as I took everything apart there was metal schards here and there but here is a word of caution.
When I got the unit apart the wavy washer on the ring gear side was deformed. It had been pinched between the side and the gear pack and distorted the waviness and the roundness of the washer. This is the wavy spring washer. Not sure if this will effect anything but will email Tom in regards to this for replacement.
Be careful putting the washer in centrally located in reference to the ring gear side cover. The wavy washer will sit in the groove and then the flat sided bearing washer will fit on top, but not be in the groove until the unit is fastened back together with the 3 screws.
As to preload Tom has said make a special tool using and old drive shaft and cut/weld on an end that you can hook a torque wrench onto or just use a bar to create leverage.
Leave one tire on the ground (drive line intact) with the other side jacked up put pressure on the bar this will show the amount of slip or grip.
Thanks again Geoff. and please email me your address.
Okay, so I'm female and like SAAB's go figure. Mind you, I like a good set of strappy sandal's just about as much though they don't take you thru the corners as fast. LOL
Rosie: http://www.saabcentral.com/forums/showt ... =Jennifers
Rosie: http://www.saabcentral.com/forums/showt ... =Jennifers
Return to “SAAB MOTORSPORT TECH”
Who is online
Users browsing this forum: No registered users and 11 guests