My friend Dan and I have discovered rust in the floorpan of his 85T that we're taking on Alcan. We've got holes at the frame, near the jacking points, plus the exh. tunnel is crapping out, again, with holes through.
What's the best plan of attack here?
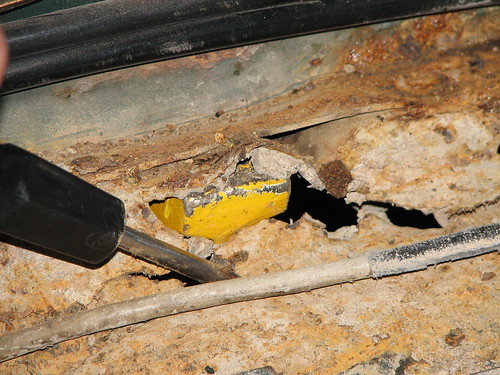
More pics:
http://www.flickr.com/photos/dcomden/sets/72157603425322224/
Would you patch each hole? Put in a donor floor, which seems like the best idea? If grafting in a floor is the way to go, any tips?
We have a spare shell that we weren't planning on taking, but could in a pinch (we were going to sell it to fund the rally). Basically, we're hoping for some advice from folks who deal with rust regularly. Here in Seattle, we don't often see it and are, frankly, bummed about discovering it.
Thanks...[/url]
Rust in Alcan 5000 Car -- Need advice
-
- Posts: 739
- Joined: Tue Mar 20, 2007 10:56 am
- Number of Saabs currently owned: 0
- Location: Ormond Beach, FL
I would probably patch each hole...but you might wind up grafting in big sections. I like to use fresh sheetmetal, I get 2'x3' sections from my local autobody store.
The first step is to get rid of all of that sound deadening material (dry ice, heat, scraping, liquid nitrogen, tactical nukes) and then see where you're at.
Then clean up area...grind off the existing rust back to bare metal (or cut out sections) and then cut a piece of cardboard that fits that hole (easiest to have some overlap, so it's not a buttweld), then take that cardboard and trace onto new metal. Cut out new metal and start tack welding in. Don't need a continuous seam, but it's nice. Fill any holes in the welds and smooth things out with seam sealer. then prime/paint surrounding area to prevent rust in future.
Oftentimes, you'll think you're patching just one area and then by the time that you've got it all cleaned up, you've just disassembled the whole car. But hey, this is fun, right?
tools needed:
angle grinder with wire brush and 4.5" grinding wheels
sheet metal
seam sealer
welder
paint
primer
-
- Posts: 9
- Joined: Thu May 17, 2007 4:35 pm
- Number of Saabs currently owned: 0
- Location: Seattle, WA
- Contact:
Thanks for the reply.
A little more investigation found more rust in the rear footwell. Nothing that's gone through but pretty good surface rust.
Also the edges in the front footwells have rust right onto the side beams, for whatever that's worth.
Waaay back when I used to see these kind of repairs done, it would be large chunks of non-rusty straight panels from wrecked cars that would be welded in. Straight non-original sheetmetal seems too different from the curves and indentations in the original metal. Do folks try and re-create those or just not worry about 'em?
I know for some of you this seems like a no-brainer repair but it's new to me and we don't have a welder in our arsenal, and very little experience wielding one. I think we could swap everything (engine, drivelines, suspension, electronics) into a non-rusty car in a couple of days. Seems like if we were to climb the rust repair learning curve we'd be at least that long considering prep and painting time. Does that seem about right?
So my concern is whether the repair would be as strong as original metal. We don't have a cage in the car. Further advice appreciated. We're kinda bummed to be dealing with this so close to the event.
- Jordan
- Site Admin
- Posts: 4068
- Joined: Fri Oct 13, 2006 2:38 pm
- Number of Saabs currently owned: 6
- Location: Vernon, CT
- Contact:
To me I guess it depends on what you have and what you are comfortable doing. Patching up the floors doesn't require a high degree of experience... you don't have to really worry about perfect match or panels warping since you will likely never see them again, you just want to make sure they are solid and sealed to prevent further damage. That said, they need to be welded..do you have access to a welder and the time to get over the learning curve? How stripped out is the car now? Do you have another shell? Does it have any issues?
If everything in the existing car is really all set except for the floors, I'd try to just patch them. However , if you start finding more and more problems with the existing shell you may want to just start swapping.
I think people tend to think that swapping everything will be easier thinking its a new shell to work with, but depending on the level that you go into, you often find more problems than you had with the old car since it really isn't a new shell... it's just a different shell.
Let me know if you need help.....
Hans,
I just repaired the floor of my recently acquired 900 this summer. I have had lots of practice unfortunately. I could bring the welder down and give you a hand.
Gregg
I just repaired the floor of my recently acquired 900 this summer. I have had lots of practice unfortunately. I could bring the welder down and give you a hand.
Gregg
Gregg Cronn
-
- Posts: 442
- Joined: Thu Nov 09, 2006 6:50 pm
- Number of Saabs currently owned: 2
- Location: Rain City
Thanks, all, for the suggestions and feedback. Looks like we are going to patch the holes after all. We've started on getting rid of the cracked sound proofing stuff (comes up surprisingly easily, not gooey or tenacious at all, which may have contributed to the rust in the first place??) and will be playing with power tools and chemicals in the next couple weeks.
-
- Posts: 9
- Joined: Thu May 17, 2007 4:35 pm
- Number of Saabs currently owned: 0
- Location: Seattle, WA
- Contact:
Was talked into patching with epoxy by my dad, a Michigan native who told me to quit whining about those little holes you can't even put a foot through.
I used West system marine epoxy combined with fiberglass after Han's help cleaning and treating with the POR-15 treatment. Then everything was painted with POR-15 paint and underbody spray was applied. That last may have been a mistake in case we ever need to re-repair anything in there. It's all scrape-able I guess.
Updated pics: http://www.flickr.com/photos/dcomden/sets/72157603425322224/
Next step is to find a decent set of stock foam pads to double up on the floor insulation. It will get COLD on the floorboards going up the Dempster highway. Oh, and plug the leaks so this doesn't happen again.
Thanks again for advice and ideas.
BTW, does anyone have a good solution for a shift shaft boot replacement where it goes through the firewall? I was thinking of fabricating something from an innertube but perhaps there's a better solution. The part is NLA and mine has failed.
- Geoff
- Team Turbo Troll Crew
- Posts: 3890
- Joined: Fri Oct 20, 2006 3:31 pm
- Nickname: Geoff
- Number of Saabs currently owned: 6
- Location: Nude Humpshire
DanComden wrote: Then everything was painted with POR-15 paint and underbody spray was applied. That last may have been a mistake in case we ever need to re-repair anything in there. It's all scrape-able I guess.
If you ever need to get at it again just drive it back up to the artic circle and hit it with a hammer. It will just chip off. No need or liquid nitrogen
The kind of dirty that doesn't wash off
- Geoff
- Team Turbo Troll Crew
- Posts: 3890
- Joined: Fri Oct 20, 2006 3:31 pm
- Nickname: Geoff
- Number of Saabs currently owned: 6
- Location: Nude Humpshire
If I knew you were going to go the glue route I would have told you to do what I do on cars that I'm not planning on keeping a long time: Remove the loose rust and POR-15 it. Then use some goop (body sealant, etc.) to glue some aluminum flashing over the hole. Good as new
The kind of dirty that doesn't wash off
Return to “SAAB MOTORSPORT TECH”
Who is online
Users browsing this forum: No registered users and 12 guests